Do you want to add custom styles in the WordPress visual editor? Adding custom styles allows you to quickly apply formatting without switching to text editor. In this article, we will show you how to add custom styles to the WordPress visual editor.
Note: This tutorial requires basic working knowledge of CSS.
Why and When You Need Custom Styles for WordPress Visual Editor
By default, WordPress visual editor comes with some basic formatting and style options. However, sometimes you may need custom styles of your own to add CSS buttons, content blocks, taglines, etc.
You can always switch from visual to text editor and add custom HTML and CSS. But if you regularly use some styles, then it would be best to add them into visual editor so that you can easily reuse them.
This will save you time spent on switching back and forth between text and visual editor. It will also allow you to consistently use the same styles throughout your website.
Most importantly, you can easily tweak or update styles without having to edit posts on your website.
Having said that, let’s take a look at how to add custom styles in WordPress visual editor.
Method 1: Add Custom Styles in Visual Editor Using Plugin
First thing you need to do is install and activate the TinyMCE Custom Styles plugin. For more details, see our step by step guide on how to install a WordPress plugin.
Upon activation, you need to visit Settings » TinyMCE Custom Styles page to configure the plugin settings.
The plugin allows you to choose the location of stylesheet files. It can use your theme or child theme’s stylesheets, or you can choose a custom location of your own.
After that, you need to click on the ‘Save All Settings’ button to store your changes.
Now you can add your custom styles. You need to scroll down a little to the style section and click on the Add new style button.
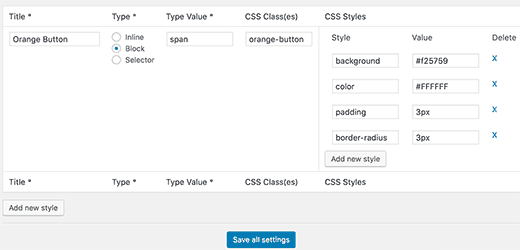
First you need to enter a title for the style. This title will be displayed in the drop down menu. Next, you need to choose whether it is an inline, block, or selector element.
After that add a CSS class and then add your CSS rules as shown in the screenshot below.
Once you have added a CSS style, simply click on the ‘Save All Settings’ button to store your changes.
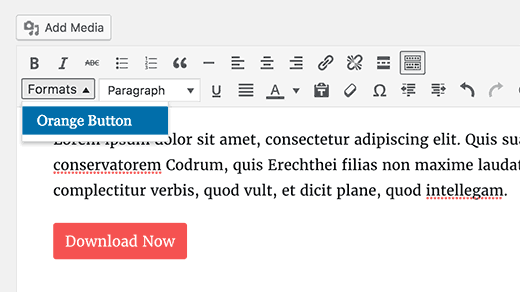
You can now edit an existing post or create a new one. You will notice a Format drop down menu in the second row of WordPress visual editor.
Simply select some text in the editor and then select your custom style from the Formats dropdown menu to apply it.
You can now preview your post to see that your custom styles are applied correctly.
Method 2: Manually Add Custom Styles to WordPress Visual Editor
This method requires you to manually add code to your WordPress files. If this is your first time adding code to WordPress, then please see our guide on adding code snippets from web into WordPress.
Step 1: Add a custom styles drop down menu in WordPress Visual Editor
First, we will add a Formats drop down menu in the WordPress visual editor. This drop down menu will then allow us to select and apply our custom styles.
You need to add the following code to your theme’s functions.php file or a site-specific plugin.
function wpb_mce_buttons_2($buttons) {
	array_unshift($buttons, 'styleselect');
	return $buttons;
}
add_filter('mce_buttons_2', 'wpb_mce_buttons_2');
Step 2: Add select options to drop down menu
Now you will need to add the options to the drop down menu you just created. You will then be able to select and apply these options from the Formats drop down menu.
For the sake of this tutorial, we are adding three custom styles to create content block and buttons.
You will need to add the following code to your theme’s functions.php file or a site-specific plugin.
/*
* Callback function to filter the MCE settings
*/

function my_mce_before_init_insert_formats( $init_array ) {

// Define the style_formats array

	$style_formats = array(
/*
* Each array child is a format with it's own settings
* Notice that each array has title, block, classes, and wrapper arguments
* Title is the label which will be visible in Formats menu
* Block defines whether it is a span, div, selector, or inline style
* Classes allows you to define CSS classes
* Wrapper whether or not to add a new block-level element around any selected elements
*/
		array(
			'title' => 'Content Block',
			'block' => 'span',
			'classes' => 'content-block',
			'wrapper' => true,

		),
		array(
			'title' => 'Blue Button',
			'block' => 'span',
			'classes' => 'blue-button',
			'wrapper' => true,
		),
		array(
			'title' => 'Red Button',
			'block' => 'span',
			'classes' => 'red-button',
			'wrapper' => true,
		),
	);
	// Insert the array, JSON ENCODED, into 'style_formats'
	$init_array['style_formats'] = json_encode( $style_formats );

	return $init_array;

}
// Attach callback to 'tiny_mce_before_init'
add_filter( 'tiny_mce_before_init', 'my_mce_before_init_insert_formats' );
You can now add a new post in WordPress and click on the Formats drop down menu in the Visual editor. You will notice that your custom styles are now visible under formats.
However, selecting them does not make any difference in the post editor right now.
Step 3: Add CSS Styles
Now the final step is to add CSS style rules for your custom styles.
You will need to add this CSS into your theme or child theme’s style.css and editor-style.css files.
.content-block {
    border:1px solid #eee;
    padding:3px;
    background:#ccc;
    max-width:250px;
    float:right;
    text-align:center;
}
.content-block:after {
    clear:both;
}
.blue-button {
	background-color:#33bdef;
	-moz-border-radius:6px;
	-webkit-border-radius:6px;
	border-radius:6px;
	border:1px solid #057fd0;
	display:inline-block;
	cursor:pointer;
	color:#ffffff;
	padding:6px 24px;
	text-decoration:none;
}

.red-button {
	background-color:#bc3315;
	-moz-border-radius:6px;
	-webkit-border-radius:6px;
	border-radius:6px;
	border:1px solid #942911;
	display:inline-block;
	cursor:pointer;
	color:#ffffff;
	padding:6px 24px;
	text-decoration:none;
}
The editor stylesheet controls the appearance of your content in the visual editor. Check your theme’s documentation to find out the location of this file.
If your theme doesn’t have an editor stylesheet file, then you can always create one. Simply create a new CSS file and name it custom-editor-style.css.
You need to upload this file to your theme’s root directory and then add this code in your theme’s functions.php file.
function my_theme_add_editor_styles() {
    add_editor_style( 'custom-editor-style.css' );
}
add_action( 'init', 'my_theme_add_editor_styles' );
That’s all. You have successfully added your custom styles into WordPress visual editor. Feel free to play around with the code by adding your own elements and styles.
We hope this article helped you learn how to add custom styles to WordPress visual editor. You may also want to see our guide on how to add custom styles to WordPress widgets.
If you liked this article, then please subscribe to our YouTube Channel for WordPress video tutorials. You can also find us on Twitter and Facebook.
The post How to Add Custom Styles to WordPress Visual Editor appeared first on WPBeginner.


Aucun commentaire:
Enregistrer un commentaire