Do you want to create a custom login page for your WordPress site? A custom login page allows your users to login from a custom page on your site instead of the default WordPress login page. In this article, we will show you how to create a custom login page for WordPress without writing any code.
Why and When You Need a Custom Login Page for WordPress?
If you are running a membership site without using a WordPress membership plugin, then your users will register and login using the default WordPress login screen.
This may work fine for small websites. However, if you are running a business website or a busy online community, then you may want to show your own brand instead of WordPress.
One way to do that is by adding your own logo and white label the WordPress admin dashboard. But if you don’t want users to access the admin area when they login, then you will need to add a custom login page.
A custom login page works like any other page of your WordPress site. It uses the colors and styles of your WordPress theme, and users don’t even get to see the admin area of your WordPress site.
Having said that, let’s see how to easily create a custom login page in WordPress without writing any code.
Video Tutorial
If you don’t like the video or need more instructions, then continue reading.
Method 1: Create Custom Login Page in WordPress with Theme My Login
First thing you need to do is install and activate the Theme My Login plugin. For more details, see our step by step guide on how to install a WordPress plugin.
Upon activation, the plugin will enable custom login page that matches your WordPress theme. You can simply visit the login page, and you will see the custom login page.
However, Theme My Login is a powerful plugin. It can also be used to create custom registration and profile pages, custom emails, and setting up custom redirects.
To enable these features you will need to click on the TML menu in the admin bar to configure plugin settings.
Simply check the box next to the module that you want to enable. Enabling each module will also enable the module’s settings tab.
For example, enabling custom emails module will add the Email tab under TML menu item.
Theme My Login also comes with a custom login widget. Visit Appearance » Widgets page and add Theme My Login widget to a sidebar.
Metod 2: Creating a Custom Login Page for WordPress Using WPForms
WPForms is the most beginner friendly contact form plugin for WordPress. The premium version of WPForms allow you to create custom WordPress login and registration forms.
WPBeginner users can use the WPForms Coupon: WPB10 to get 10% off on their purchase.
First thing you need to do is install and activate the WPForms plugin. For more details, see our step by step guide on how to install a WordPress plugin.
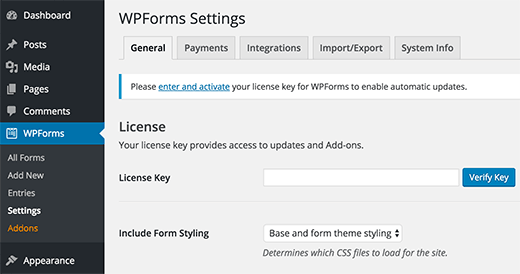
Upon activation, you need to visit WPForms » Settings page to enter your license key. You can get this license key from your account on WPForms website.
After verification, you need to head over to WPForms » Addons page. Scroll down to ‘User Registration Addon’ and click on the Install Addon button next to it.
WPForms will fetch and install the addon. You need to click on the activate button to start using this addon.
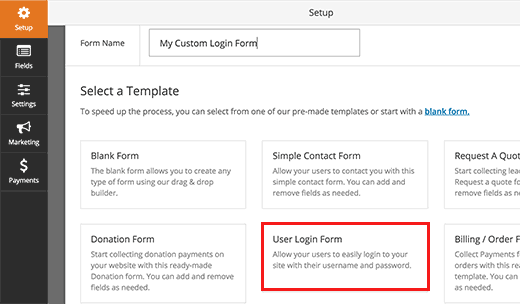
Once activated, you are ready to create a custom login form using WPForms. Visit WPForms » Add New page, enter a form name and then select ‘User Login Form’ template.
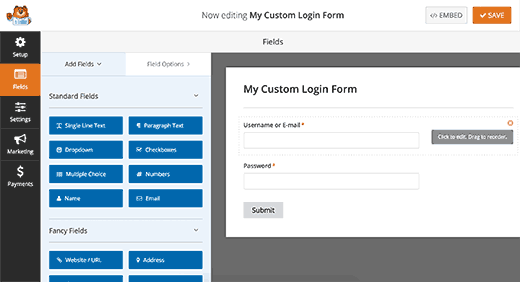
This will launch WPForms’ Form Builder. You will see the login fields pre-loaded in your form. You can click on a field to edit it.
Next, you need to click on the Settings tab and then select confirmation. This is where you define what to do upon successful login.
You can show users a message, show them a page, or redirect them to any URL.
Click on the Save button to store your form settings and then click on the close button to exit form builder.
You are now ready to add this custom login form to a page in your WordPress site.
Simply create a new page or edit an existing one that you want to use as your custom login page. Click on the Add Form button above the post editor.
This will bring up a popup where need to select the custom login form you created earlier and click on the add form button.
The form shortcode will appear in the post editor. You can continue editing the page, or you can save or publish it.
That’s all, you can now visit your website to your custom login page in action.
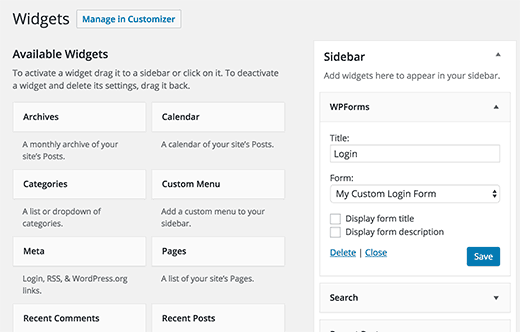
You can also add the login form as a widget to the sidebar of your WordPress site. Visit Appearance » Widgets page and add WPForms widget to a sidebar.
Select your custom login form in the widget settings and click on the save button to store changes.
WPForms can not only create a custom login page, it can also be used to create a custom user registration page with anti-spam features. See our guide on how to stop spam user registration on your WordPress membership site for detailed instructions.
That’s all, we hope this article helped you create a custom login page for your WordPress site. You may also want to see our list of 10 WordPress plugins that will quickly help you get more traffic.
If you liked this article, then please subscribe to our YouTube Channel for WordPress video tutorials. You can also find us on Twitter and Facebook.
The post How to Create a Custom Login Page for WordPress appeared first on WPBeginner.


Aucun commentaire:
Enregistrer un commentaire