Affichage des articles dont le libellé est Custom. Afficher tous les articles

samedi 12 novembre 2016

How to Create a Custom Facebook Feed in WordPress


Recently, one of our users asked if we could cover how to create a custom Facebook feed in WordPress? You can display Facebook posts from your page or group on your WordPress site to improve engagement. In this article, we will show you how to create a custom Facebook feed in WordPress.


Adding a Facebook feed in WordPress


When and Why You Should Create a Custom Facebook Feed in WordPress


Facebook is the largest social media platform in the world. As a website owner, you may already be engaging with your audiences on Facebook through your Facebook page or by creating a Facebook group.


However, all the posts you make on Facebook are not visible to the people visiting your website. By adding a custom Facebook feed you can show what’s happening on your Facebook page or group to your site visitors.


This will allow more of your users to see your posts and will help you get more Facebook likes. If you are using Facebook remarketing/retargeting pixel on your website, then you can show your ads to those users on Facebook as well.


Having said that, let’s see how to add a custom Facebook feed to your WordPress site.


Adding a Custom Facebook Feed in WordPress


First thing you need to do is install and acivate the Custom Facebook Feed plugin. For more details, see our step by step guide on how to install a WordPress plugin.


Note: This free version of the plugin does not display images in shared links or status updates. For that you will need plugin’s PRO version.


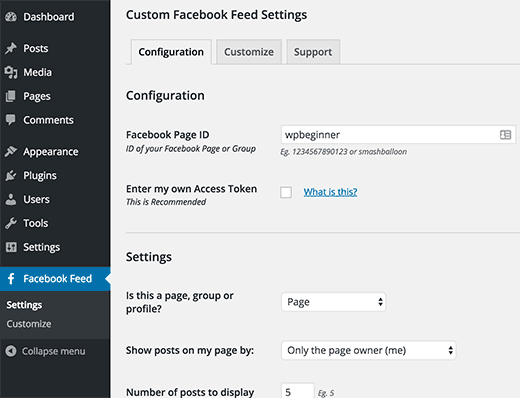
Upon activation, you need to visit Facebook Feed » Settings page to configure the plugin settings.


Custom Facebook feed settings


First you need to provide your Facebook page or group ID. If your Facebook page URL is like this:


https://www.facebook.com/your_page_name


Then you can use your_page_name as your Facebook page ID. On the other hand, if you have a Facebook page URL that looks like this:


https://www.facebook.com/pages/your_page_name/123654123654123


Then you need to use 123654123654123 as your page ID.


If you want to add a group, then you will need to enter your group ID. Simply visit Find My Facebook ID website, and enter the URL of your group in the search box. The website will reveal your Facebook group’s numeric ID.


The next thing you need to enter is an access token. The plugin will work even if you don’t add your own access token, however it is recommended to generate it and add it here.


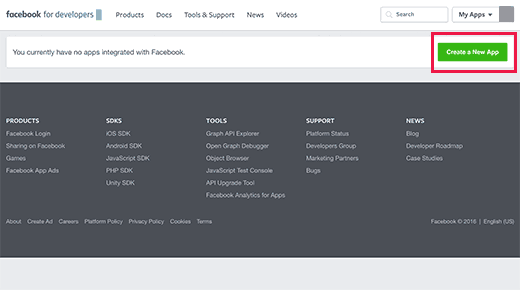
Simply visit Facebook developers website and click on the create new app button.


New Facebook app


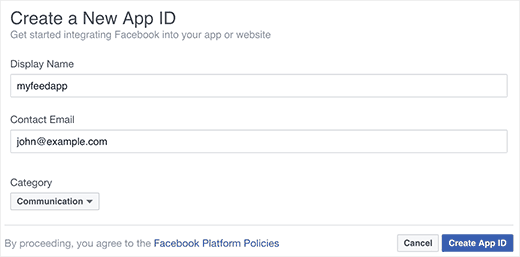
This will bring up a popup where you need to enter a name for your app. Provide an email address and then select a category for your app. Click on the ‘Create App ID’ button to continue.


Creating a new Facebook app ID


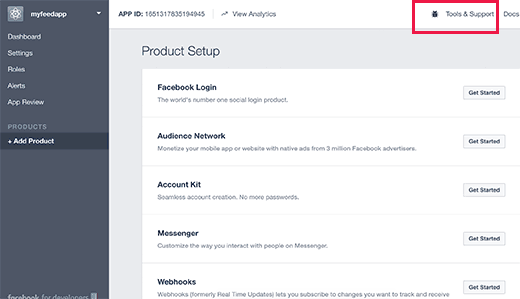
Facebook will create an app for you and will redirect you to the app’s dashboard. You need to click on Tools & Support link at the top.


Click on tools and support link at the top of your app's dashboard page


This will bring you to a page with lots of resources on how to use Facebook apps. You just need to click on ‘Access token tool’.


Access token tool


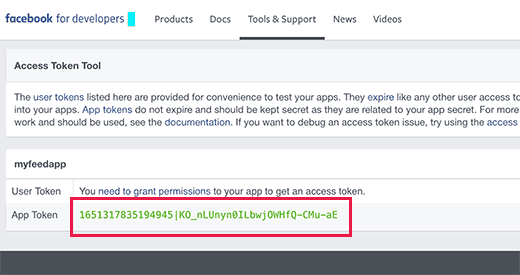
Clicking on the link will take you to a page where you will be able to see your app’s access token or app token.


Access token for your app


You can now copy and paste this access token to the custom Facebook feed plugin’s settings page.


Under the settings section on the page, you need to select whether you are showing a group or a page. You can also choose the number of posts to display, timezone, and language settings.


Don’t forget to click on the save changes button to store your plugin settings.


You can now create a new post or page or edit an existing one where you want to display your Facebook feed. In the post editor, you need to add this shortcode:


[custom-facebook-feed]


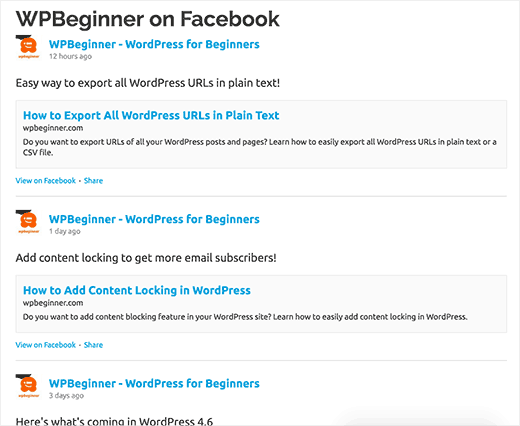
You can now save your page or post and preview it. It will fetch and display latest posts from your Facebook page or group in your WordPress page.


Preview of a custom Facebook feed in WordPress


Showing Multiple Facebook Feeds in WordPress


Let’s suppose you want to display more than one custom Facebook feed on your WordPress site. The plugin’s settings only allow you to add one page or group ID.


However, you can easily use the shortcode to display any other custom Facebook feed you want.


Simply add the shortcode like this:


[custom-facebook-feed id=wpbeginner]


The plugin’s shortcode comes with a whole range of parameters. You can visit the plugin’s website to see the complete list of parameters that you can use.


How to Customize The Appearance of Custom Facebook Feed


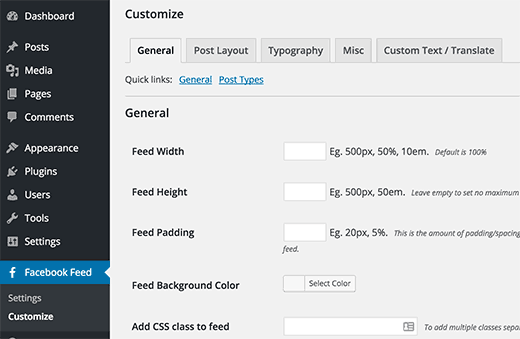
The plugin allows you customize the appearance of the custom Facebook feed on your website. Visit Facebook Feed » Customize page to edit the customization settings.


Customize appearance of Facebook feed


The customize section is divided into different tabs. Each tab has its own options, you may want to review them to customize the appearance of your custom Facebook feed.


We hope this article helped you add custom Facebook feed in WordPress. You may also want to see our list of 21 best social media monitoring tools for WordPress users.


If you liked this article, then please subscribe to our YouTube Channel for WordPress video tutorials. You can also find us on Twitter and Facebook.


The post How to Create a Custom Facebook Feed in WordPress appeared first on WPBeginner.


How to Add Custom Styles to WordPress Visual Editor


Do you want to add custom styles in the WordPress visual editor? Adding custom styles allows you to quickly apply formatting without switching to text editor. In this article, we will show you how to add custom styles to the WordPress visual editor.


Adding custom styles in WordPress visual editor


Note: This tutorial requires basic working knowledge of CSS.


Why and When You Need Custom Styles for WordPress Visual Editor


By default, WordPress visual editor comes with some basic formatting and style options. However, sometimes you may need custom styles of your own to add CSS buttons, content blocks, taglines, etc.


You can always switch from visual to text editor and add custom HTML and CSS. But if you regularly use some styles, then it would be best to add them into visual editor so that you can easily reuse them.


This will save you time spent on switching back and forth between text and visual editor. It will also allow you to consistently use the same styles throughout your website.


Most importantly, you can easily tweak or update styles without having to edit posts on your website.


Having said that, let’s take a look at how to add custom styles in WordPress visual editor.


Method 1: Add Custom Styles in Visual Editor Using Plugin


First thing you need to do is install and activate the TinyMCE Custom Styles plugin. For more details, see our step by step guide on how to install a WordPress plugin.


Upon activation, you need to visit Settings » TinyMCE Custom Styles page to configure the plugin settings.


TinyMCE Custom Styles settings


The plugin allows you to choose the location of stylesheet files. It can use your theme or child theme’s stylesheets, or you can choose a custom location of your own.


After that, you need to click on the ‘Save All Settings’ button to store your changes.


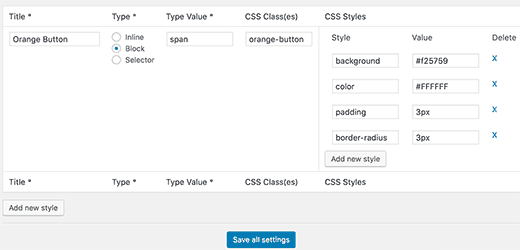
Now you can add your custom styles. You need to scroll down a little to the style section and click on the Add new style button.


First you need to enter a title for the style. This title will be displayed in the drop down menu. Next, you need to choose whether it is an inline, block, or selector element.


After that add a CSS class and then add your CSS rules as shown in the screenshot below.


Adding a new custom style


Once you have added a CSS style, simply click on the ‘Save All Settings’ button to store your changes.


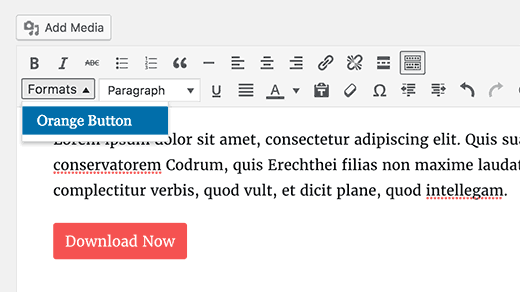
You can now edit an existing post or create a new one. You will notice a Format drop down menu in the second row of WordPress visual editor.


Custom style menu in TinyMCE


Simply select some text in the editor and then select your custom style from the Formats dropdown menu to apply it.


You can now preview your post to see that your custom styles are applied correctly.


Method 2: Manually Add Custom Styles to WordPress Visual Editor


This method requires you to manually add code to your WordPress files. If this is your first time adding code to WordPress, then please see our guide on adding code snippets from web into WordPress.


Step 1: Add a custom styles drop down menu in WordPress Visual Editor


First, we will add a Formats drop down menu in the WordPress visual editor. This drop down menu will then allow us to select and apply our custom styles.


You need to add the following code to your theme’s functions.php file or a site-specific plugin.


function wpb_mce_buttons_2($buttons) {
array_unshift($buttons, 'styleselect');
return $buttons;
}
add_filter('mce_buttons_2', 'wpb_mce_buttons_2');

Step 2: Add select options to drop down menu


Now you will need to add the options to the drop down menu you just created. You will then be able to select and apply these options from the Formats drop down menu.


For the sake of this tutorial, we are adding three custom styles to create content block and buttons.


You will need to add the following code to your theme’s functions.php file or a site-specific plugin.


/*
* Callback function to filter the MCE settings
*/

function my_mce_before_init_insert_formats( $init_array ) {

// Define the style_formats array

$style_formats = array(
/*
* Each array child is a format with it's own settings
* Notice that each array has title, block, classes, and wrapper arguments
* Title is the label which will be visible in Formats menu
* Block defines whether it is a span, div, selector, or inline style
* Classes allows you to define CSS classes
* Wrapper whether or not to add a new block-level element around any selected elements
*/
array(
'title' => 'Content Block',
'block' => 'span',
'classes' => 'content-block',
'wrapper' => true,

),
array(
'title' => 'Blue Button',
'block' => 'span',
'classes' => 'blue-button',
'wrapper' => true,
),
array(
'title' => 'Red Button',
'block' => 'span',
'classes' => 'red-button',
'wrapper' => true,
),
);
// Insert the array, JSON ENCODED, into 'style_formats'
$init_array['style_formats'] = json_encode( $style_formats );

return $init_array;

}
// Attach callback to 'tiny_mce_before_init'
add_filter( 'tiny_mce_before_init', 'my_mce_before_init_insert_formats' );

You can now add a new post in WordPress and click on the Formats drop down menu in the Visual editor. You will notice that your custom styles are now visible under formats.


However, selecting them does not make any difference in the post editor right now.


Step 3: Add CSS Styles


Now the final step is to add CSS style rules for your custom styles.


You will need to add this CSS into your theme or child theme’s style.css and editor-style.css files.


.content-block {
border:1px solid #eee;
padding:3px;
background:#ccc;
max-width:250px;
float:right;
text-align:center;
}
.content-block:after {
clear:both;
}
.blue-button {
background-color:#33bdef;
-moz-border-radius:6px;
-webkit-border-radius:6px;
border-radius:6px;
border:1px solid #057fd0;
display:inline-block;
cursor:pointer;
color:#ffffff;
padding:6px 24px;
text-decoration:none;
}

.red-button {
background-color:#bc3315;
-moz-border-radius:6px;
-webkit-border-radius:6px;
border-radius:6px;
border:1px solid #942911;
display:inline-block;
cursor:pointer;
color:#ffffff;
padding:6px 24px;
text-decoration:none;
}

Custom styles in WordPress post editor


The editor stylesheet controls the appearance of your content in the visual editor. Check your theme’s documentation to find out the location of this file.


If your theme doesn’t have an editor stylesheet file, then you can always create one. Simply create a new CSS file and name it custom-editor-style.css.


You need to upload this file to your theme’s root directory and then add this code in your theme’s functions.php file.


function my_theme_add_editor_styles() {
add_editor_style( 'custom-editor-style.css' );
}
add_action( 'init', 'my_theme_add_editor_styles' );

That’s all. You have successfully added your custom styles into WordPress visual editor. Feel free to play around with the code by adding your own elements and styles.


We hope this article helped you learn how to add custom styles to WordPress visual editor. You may also want to see our guide on how to add custom styles to WordPress widgets.


If you liked this article, then please subscribe to our YouTube Channel for WordPress video tutorials. You can also find us on Twitter and Facebook.


The post How to Add Custom Styles to WordPress Visual Editor appeared first on WPBeginner.


How to Create a Custom User Registration Form in WordPress


Do you want to create a custom front-end user registration form in WordPress? The default WordPress user registration form shows WordPress branding and does not match your site’s theme. In this article, we will show you how to create a custom user registration form in WordPress.


How to Create a Custom User Registration Form in WordPress


Why Add a Custom User Registration Form in WordPress


The default WordPress user registration page shows WordPress branding and logo. It does not match the rest of your WordPress site.


Creating a custom user registration form allows you to add the registration form on any page of your WordPress site. It helps you deliver a more consistent user experience during the registration process.


A custom user registration form also allows you to redirect users upon registration. You can also display additional user profile fields, combine it with custom front-end login form, and connect it with your email marketing service.


Having said that, let’s take a look at how to create a custom user registration form in WordPress.


Creating a Custom User Registration Form in WordPress


First thing you need to do is install and activate the WPForms – WordPress forms plugin. For more details, see our step by step guide on how to install a WordPress plugin.


WPForms is the best WordPress contact form plugin that allows you to create all type of forms in WordPress.


You will need at least the Pro plan to get access to their user registration addon.


You can use our WPForms coupon: WPB10 to get 10% discount on your purchase of any WPForms plan.


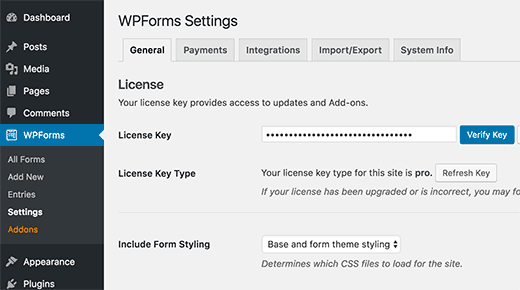
Upon activation, you need to visit WPForms » Settings page to enter your WPForms license key. You can get this key from your account on WPForms website.


Add your WPForms License key


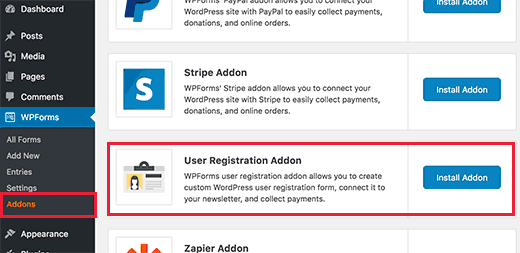
Next, you need to visit WPForms » Addons page. Click on the ‘Install Addon’ button next to ‘User Registration Addon’.


Install user registration addon


WPForms will now download and install the User Registration Addon. You will need to click on the ‘Activate’ button to start using the addon.


Activate user registration addon


You are now ready to create your custom user registration form.


You need to visit WPForms » Add New to launch the WPForms Builder.


First, you need to enter a name for your form and then select ‘User Registration Form’ as template.


Form builder setup


WPForms will now create a simple registration form for you. This sample form will have following WordPress user registration fields added by default.


  • Name – First and last name

  • Username

  • Email

  • Password

  • Short bio


You can add more fields from the left panel. You can also drag fields to rearrange their order.


Adding Custom Fields in Your Custom User Registration Form


WPForms also allows you to connect custom user profile fields to your user registration form.


To do this, you will need to add additional user profile fields to your WordPress site. The easiest way to do this is by using a plugin.


In this example, we are using User Meta Manager plugin. However, the field mapping feature of WPForms works with any plugin that uses standard WordPress custom fields to add and store user meta data.


First thing you need to do is install and activate the User Meta Manager plugin. For more details, see our step by step guide on how to install a WordPress plugin.


Upon activation, you need to visit Users » User Meta Manager page and click on Add Custom Meta button to continue.


Adding custom user meta to user profiles in WordPress


First you need to enter a key. This key is how the custom user profile field will be recognized internally.


Next you need to choose a field type. In this example, we are using a URL field to add Facebook profile URL. Under ‘Label’, you need to enter the label that will be visible to users when filling this field.


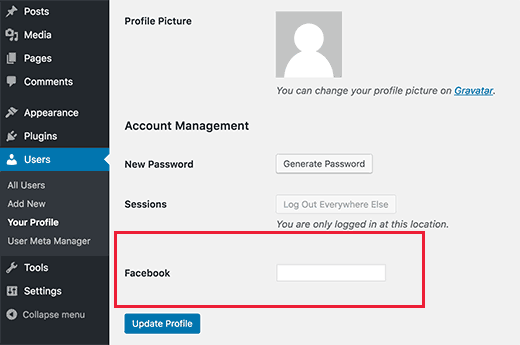
Click on the Submit button to add the custom meta field. You can now visit Users » Your Profile page to see the field in action.


A custom user profile field to add Facebook profile URL


Now that we have created a custom user profile field, let’s add it to the custom user registration form in WPForms and then map it.


You will need to visit WPForms » All Forms page to edit your custom user registration form or create a new one.


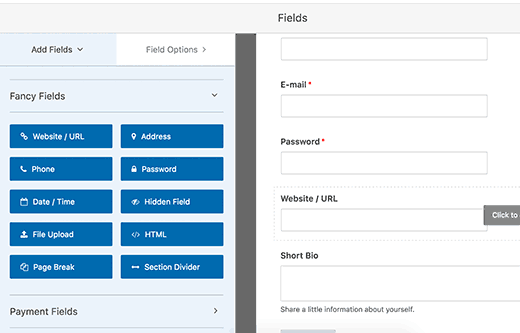
After that click on a field from the left panel to add it to your form. In this example, we are adding a website/URL field to our form.


Adding fields


The website / URL field will now appear in your form preview. You need to click on the field and WPForms will show its properties in the left panel.


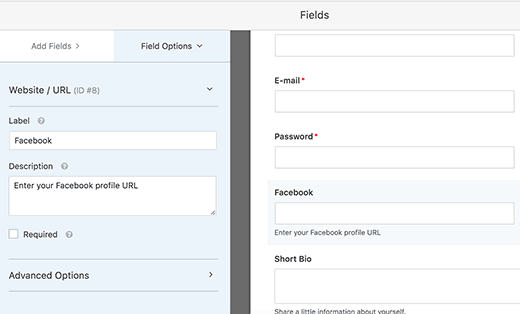
We need to change the label from Website/URL to Facebook Profile URL. You can also add a description for the field.


Edit field


Don’t forget to click on the Save button at the top right corner of the screen to save your form.


Next, you need to click on the Settings button for advanced form settings and field mapping. On the Settings page, click on the User Registration tab.


WPForms will now show your form fields and a drop down menu below them to select the WordPress registration field to map it with.


You will notice that WPForms will automatically map your default fields like Name, Email, Password, etc. You can also select a page where you want users to be redirected to once they submit the form.


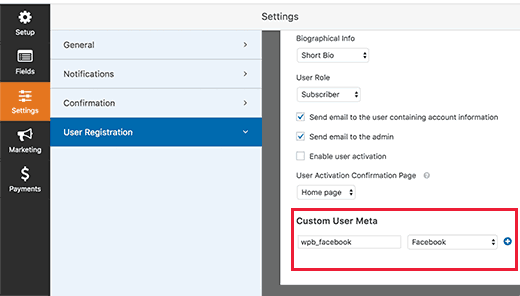
You will need to scroll down to the ‘Custom User Meta’ section. Here you can enter the custom meta key you created earlier and then select the form field you want to map it with.


Mapping custom fields


Don’t forget to click on the Save button on the top right corner of the screen to save your settings.


Adding Your Custom User Registration form in WordPress


WPForms makes it super simple to add forms into your WordPress posts, pages, and sidebar widgets.


You need to create a new post/page or edit an existing one. On the post edit screen, you will notice the new WPForms button.


Adding a form in WordPress posts or page


Clicking on it will bring up a popup. You need to select your form from the drop down menu and then click on the Add Form button.


You will notice the WPForms shortcode will appear in your post’s content editor. You can now publish or save your post/page and then preview your form.


Previewing custom user registration form


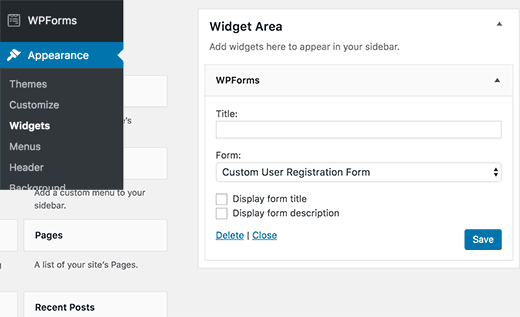
WPForms also allows you to add your custom user registration form in your sidebar. Visit Appearance » Widgets page and add WPForm widget to a sidebar.


Add custom user registration form to sidebar in WordPress


You need to select the form you want to show from the drop down menu in the widget settings. Don’t forget to click on the save button to store your widget settings.


That’s all, you can now visit your website to see your custom user registration form in action.


Custom registration form in sidebar


We hope this article helped you learn how to easily add a custom user registration form in WordPress. You may also want to see our list of 10 WordPress plugins that will quickly help you get more traffic.


If you liked this article, then please subscribe to our YouTube Channel for WordPress video tutorials. You can also find us on Twitter and Facebook.


The post How to Create a Custom User Registration Form in WordPress appeared first on WPBeginner.


How to Create a Custom Login Page for WordPress


Do you want to create a custom login page for your WordPress site? A custom login page allows your users to login from a custom page on your site instead of the default WordPress login page. In this article, we will show you how to create a custom login page for WordPress without writing any code.


Creating a custom login page for WordPress


Why and When You Need a Custom Login Page for WordPress?


If you are running a membership site without using a WordPress membership plugin, then your users will register and login using the default WordPress login screen.


This may work fine for small websites. However, if you are running a business website or a busy online community, then you may want to show your own brand instead of WordPress.


One way to do that is by adding your own logo and white label the WordPress admin dashboard. But if you don’t want users to access the admin area when they login, then you will need to add a custom login page.


A custom login page works like any other page of your WordPress site. It uses the colors and styles of your WordPress theme, and users don’t even get to see the admin area of your WordPress site.


Having said that, let’s see how to easily create a custom login page in WordPress without writing any code.


Video Tutorial


If you don’t like the video or need more instructions, then continue reading.


Method 1: Create Custom Login Page in WordPress with Theme My Login


First thing you need to do is install and activate the Theme My Login plugin. For more details, see our step by step guide on how to install a WordPress plugin.


Upon activation, the plugin will enable custom login page that matches your WordPress theme. You can simply visit the login page, and you will see the custom login page.


Custom login page created with Theme My Login plugin


However, Theme My Login is a powerful plugin. It can also be used to create custom registration and profile pages, custom emails, and setting up custom redirects.


To enable these features you will need to click on the TML menu in the admin bar to configure plugin settings.


Theme My Login settings


Simply check the box next to the module that you want to enable. Enabling each module will also enable the module’s settings tab.


For example, enabling custom emails module will add the Email tab under TML menu item.


Theme My Login custom emails tab


Theme My Login also comes with a custom login widget. Visit Appearance » Widgets page and add Theme My Login widget to a sidebar.


Theme My Login widget


Metod 2: Creating a Custom Login Page for WordPress Using WPForms


WPForms is the most beginner friendly contact form plugin for WordPress. The premium version of WPForms allow you to create custom WordPress login and registration forms.


WPBeginner users can use the WPForms Coupon: WPB10 to get 10% off on their purchase.


First thing you need to do is install and activate the WPForms plugin. For more details, see our step by step guide on how to install a WordPress plugin.


Upon activation, you need to visit WPForms » Settings page to enter your license key. You can get this license key from your account on WPForms website.


Adding WPForms license key


After verification, you need to head over to WPForms » Addons page. Scroll down to ‘User Registration Addon’ and click on the Install Addon button next to it.


User registration addon


WPForms will fetch and install the addon. You need to click on the activate button to start using this addon.


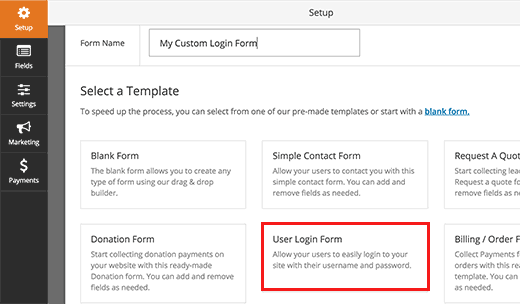
Once activated, you are ready to create a custom login form using WPForms. Visit WPForms » Add New page, enter a form name and then select ‘User Login Form’ template.


New login fom


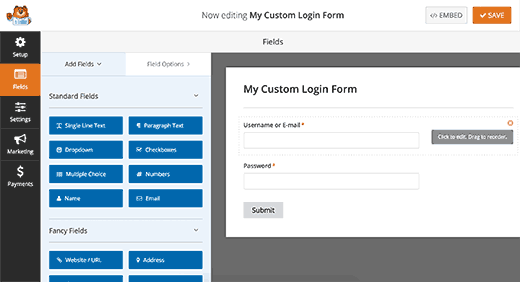
This will launch WPForms’ Form Builder. You will see the login fields pre-loaded in your form. You can click on a field to edit it.


Editing your login form


Next, you need to click on the Settings tab and then select confirmation. This is where you define what to do upon successful login.


Login confirmation


You can show users a message, show them a page, or redirect them to any URL.


Click on the Save button to store your form settings and then click on the close button to exit form builder.


You are now ready to add this custom login form to a page in your WordPress site.


Simply create a new page or edit an existing one that you want to use as your custom login page. Click on the Add Form button above the post editor.


Add form


This will bring up a popup where need to select the custom login form you created earlier and click on the add form button.


The form shortcode will appear in the post editor. You can continue editing the page, or you can save or publish it.


That’s all, you can now visit your website to your custom login page in action.


Login page preview


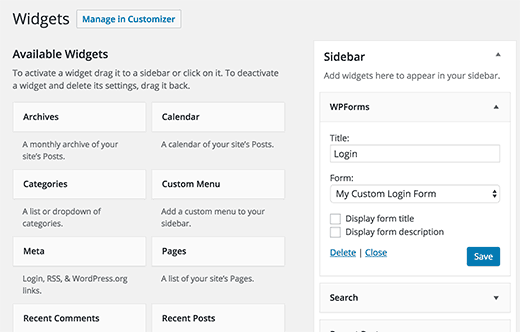
You can also add the login form as a widget to the sidebar of your WordPress site. Visit Appearance » Widgets page and add WPForms widget to a sidebar.


Select your custom login form in the widget settings and click on the save button to store changes.


Add custom login form to a sidebar widget


WPForms can not only create a custom login page, it can also be used to create a custom user registration page with anti-spam features. See our guide on how to stop spam user registration on your WordPress membership site for detailed instructions.


That’s all, we hope this article helped you create a custom login page for your WordPress site. You may also want to see our list of 10 WordPress plugins that will quickly help you get more traffic.


If you liked this article, then please subscribe to our YouTube Channel for WordPress video tutorials. You can also find us on Twitter and Facebook.


The post How to Create a Custom Login Page for WordPress appeared first on WPBeginner.


How to Add Custom Navigation Menus in WordPress Themes


Do you want to add custom navigation menus in your WordPress theme? By default, many WordPress themes come with pre-defined menu locations and layouts. In this article, we will show you how to add more navigation menus in your WordPress theme.


Add Navigation Menu to Themes


When Do You Need this WordPress Navigation Menu tutorial?


Most WordPress themes come with at least one spot where you can display your site’s navigation links in a menu.


You can manage menu items from an easy to use interface inside your WordPress admin area.


If you’re just looking to add navigation menus on your website, then follow our beginner’s guide on how to add a navigation menu in WordPress.


This tutorial is geared towards DIY users who are building a custom WordPress theme or someone who needs to add additional menu locations to an existing WordPress theme.


Having said that, let’s take a look at how to add custom WordPress navigation menus in your theme.


Creating Custom Navigation Menus in WordPress Themes


Navigation menus are a feature of WordPress themes. Each theme can define their own menu locations and menu support.


To add a custom navigation menu, the first thing you need to do is register your new navigation menu by adding this code to your theme’s functions.php file.


function wpb_custom_new_menu() {
register_nav_menu('my-custom-menu',__( 'My Custom Menu' ));
}
add_action( 'init', 'wpb_custom_new_menu' );

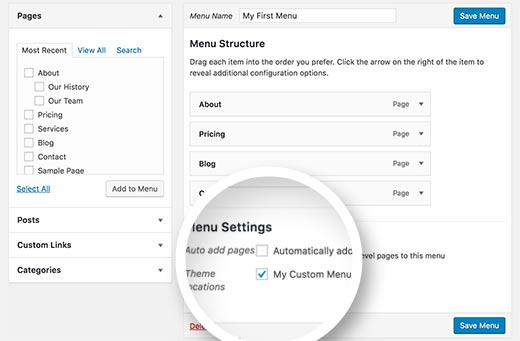
You can now go to Appearance » Menus page in your WordPress admin and try to create or edit a new menu. You will see ‘My Custom Menu’ as theme location option.


Custom menu as theme location


If you want to add more than one new navigation menu location, then you would need to use a code like this:


function wpb_custom_new_menu() {
register_nav_menus(
array(
'my-custom-menu' => __( 'My Custom Menu' ),
'extra-menu' => __( 'Extra Menu' )
)
);
}
add_action( 'init', 'wpb_custom_new_menu' );

Once you have added the menu location, go ahead and add some menu items in the WordPress admin by following our tutorial on how to add navigation menus for beginners.


This will allow us to move on to the next step which is displaying the menu in your theme.


Displaying Custom Navigation Menus in WordPress Themes


Next, we need to display the new navigation menu in your WordPress theme. The most common place where navigation menus are usually placed is in the header section of a website just after the site title or logo.


However, you can add your navigation menu anywhere that you want.


You will need to add this code in your theme’s template file where you want to display your menu.


<?php
wp_nav_menu( array(
'theme_location' => 'my-custom-menu',
'container_class' => 'custom-menu-class' ) );
?>


The theme location is the name that we selected in the previous step.


The container class is the CSS class that will be added to your navigation menu. Your menu will appear as a plain bulleted list in your website.


Custom menu displayed as plain list


You can use the CSS class .custom_menu_class to style your menus. Here is a sample CSS to help you get started:


div.custom-menu-class ul {
list-style-type: none;
list-style: none;
list-style-image: none;
}
div.custom-menu-class li {
padding: 20px;
display: inline;
}

If you need further assistance with the CSS and menu layouts, then we recommend using one of these WordPress starter themes to build out your custom themes.


Creating Mobile-Friendly Responsive Menus in WordPress


With the increase in usage of mobile devices, you may want to make your menus mobile-friendly by adding one of the many popular effects.


Responsive menu plugin demo


You can add a slide out effect (above), dropdown effect, and even a toggle effect for mobile menus.


We have a detailed step by step guide on how to make mobile-ready responsive WordPress menus.


Do More With WordPress Navigation Menus


Navigation menus are a powerful web design tool. They allow you to point users to the most important sections of your website.


WordPress allows you to do a lot more than just displaying links in your menu. Try these useful tutorials to extend the functionality of navigation menus on your WordPress site.


That’s all, we hope this ultimate guide helped you learn how to add a navigation menu in WordPress. You may also want to see our list of 25 most useful WordPress widgets for your site.


If you liked this article, then please subscribe to our YouTube Channel for WordPress video tutorials. You can also find us on Twitter and Facebook.


The post How to Add Custom Navigation Menus in WordPress Themes appeared first on WPBeginner.


How to Add Custom Admin Notices in WordPress


Do you want to add admin notices in WordPress? Admin notices are used by WordPress core, themes, and plugins to display warnings, notices, and important on screen information to users. In this article, we will show you how you can add admin notices in WordPress.


How to Add Admin Notices in WordPress


Why and When to Use Admin Notices in WordPress?


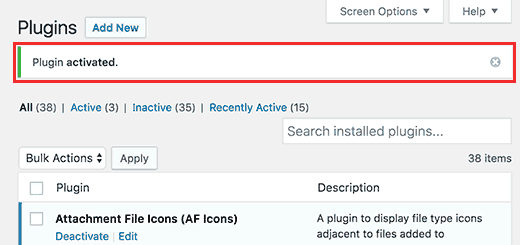
WordPress uses admin notices to alert users about errors, warnings, and success messages.


Example of a default WordPress admin notice


Individual site owners, plugin authors, and theme developers can also use admin notices.


If you are working on a website for clients who are not familiar with WordPress, then you can add admin notices to display helpful information across their WordPress admin area.


Custom admin notices can also be helpful if you run a multi-author WordPress site. You can add notices to guide new authors and help them find their way around.


However, we recommend using admin notices carefully. They can be really annoying and may ruin the WordPress experience for your users.


Having said that, let’s take a look at how you can add your own custom admin notices in WordPress.


Method 1: Add Custom Notices in WordPress Manually


This method requires you to add code to your WordPress site. If you have never added code before, then take a look at our guide on pasting snippets from the web into WordPress.


Let’s get started.


First you need to add this code to your theme’s functions.php file or a site-specific plugin.


function general_admin_notice(){
global $pagenow;
if ( $pagenow == 'options-general.php' ) {
echo '<div class="notice notice-warning is-dismissible">
<p>This notice appears on the settings page.</p>
</div>';
}
}
add_action('admin_notices', 'general_admin_notice');

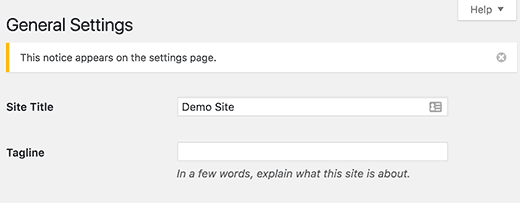
This code displays a notice on the settings page with a yellow border and a button to close the notice. This is how it will appear on your site:


Custom admin notice example


If you study the code, you will notice that we have used $pagenow variable to detect the current page.


After that we added the condition that checks if the current page meets the page where we want to display the notice.


If it does, then we show the notice wrapped in a <div> element. This div element uses CSS classes already defined in the WordPress admin stylesheet for different type of notices.


You need to use notice class and then you can add notice-error, notice-warning, notice-success, or notice-info.


Optionally, you can use is-dismissible class which adds a button to close the notice.


Apart from checking the current page, you can add all kind of conditions to show notices matching different scenarios.


For example, you want to display a notice only to users with the author user role.


Here is how you will do that:


function author_admin_notice(){
global $pagenow;
if ( $pagenow == 'index.php' ) {
$user = wp_get_current_user();
if ( in_array( 'author', (array) $user->roles ) ) {
echo '<div class="notice notice-info is-dismissible">
<p>Click on <a href="edit.php">Posts</a> to start writing.</p>
</div>';
}
}
}
add_action('admin_notices', 'author_admin_notice');

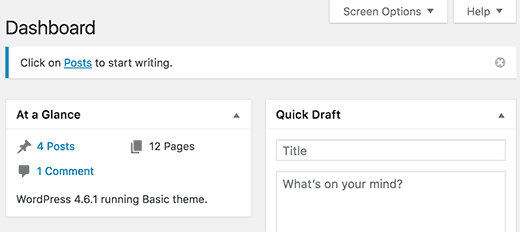
As you can see that we have added an extra check to detect the user role in our function.


This is how it will appear on your site.


Custom notice by user role


Feel free to practice with different conditions, filters, and hooks to play with admin notices.


Method 2: Add Admin Notices Using a WordPress Plugin


This method is simpler as it does not require you to add code. However, it is not as flexible as the custom code method.


First thing you need to do is install and activate the KJM Admin Notices plugin. For more details, see our step by step guide on how to install a WordPress plugin.


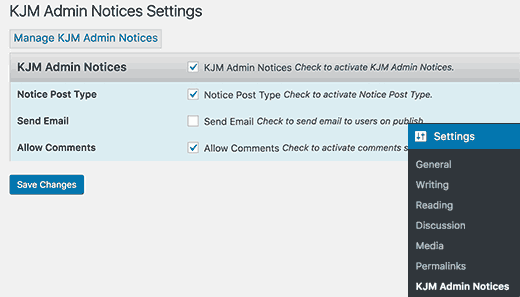
Upon activation, you need to visit Settings » KJM Admin Notices page to configure plugin settings.


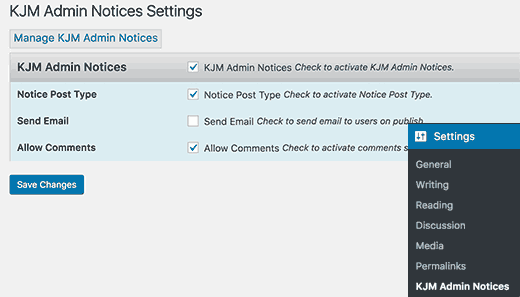
KJM Admin Notices settings


First, you need to check the option to enable KJM Admin Notices. The second option adds a custom post type where you can add and edit your custom admin notices.


The plugin also allows you to send an email to registered users when you publish a new notice. You can check the box next to ‘Send Email’ option if you want to use this feature.


You can also enable comments for your notices which will allow users to respond to notices by adding comments. To enable this feature, check the box next to ‘Allow Comments’ option.


Don’t forget to click on the save changes button to store your settings.


You will now see a new menu item labeled notices in your WordPress admin bar. This is where you can add and edit your custom admin notices.


Let’s create your first admin notice.


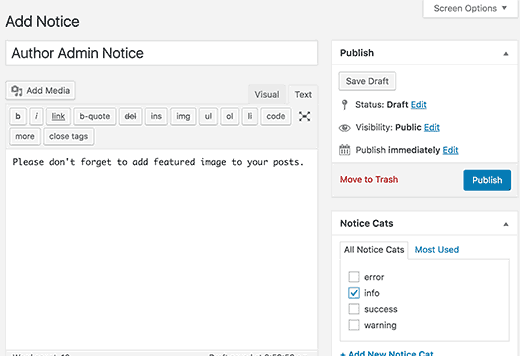
Visit Notices » Add Notice page. You will see a screen much like the WordPress post edit screen.


Add new custom notice


Start by adding a title for your notice, then add the actual notice in the post editor. You can select the notice category from the box on your right hand.


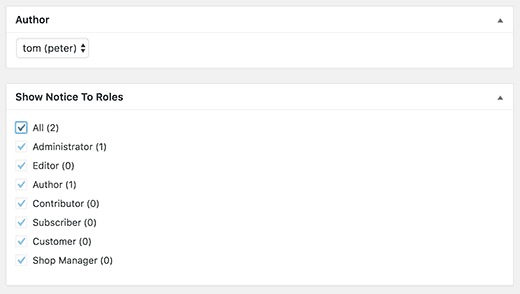
Next you need to select the user roles which will see this notice.


Select user roles that will see the notice


You can optionally show or hide title, author and date, and the button to dismiss notice.


Once you are finished, click on the publish button and your custom admin notice will go live.


KJM admin notices


KJM Admin Notices allows you to manage your custom admin notices without writing any code. You can delete or unpublish notices that you don’t want to display any more.


Using the email feature, you can also use it to alert all your users even if they don’t log in to check notices.


Having problems sending emails? See our guide on how to fix WordPress not sending email issue.


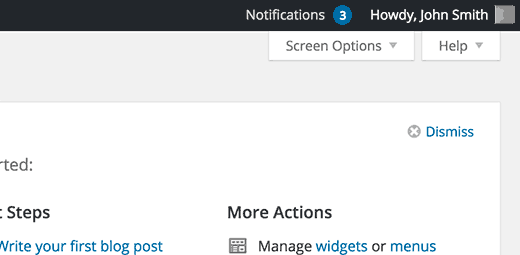
You may also want to take a look at WP Notification Center plugin. It adds a Facebook-like notification center in WordPress. Users can click on the notification icon to see their notifications.


Notification center


That’s all. We hope this article helped you learn how to add custom admin notices in WordPress. You may also want to see our guide on how to create a custom user registration form in WordPress.


If you liked this article, then please subscribe to our YouTube Channel for WordPress video tutorials. You can also find us on Twitter and Facebook.


The post How to Add Custom Admin Notices in WordPress appeared first on WPBeginner.

Page 5 – WPBeginner