Affichage des articles dont le libellé est Setup. Afficher tous les articles

samedi 12 novembre 2016

How to Setup Email Notifications for WordPress Updates


Keeping your WordPress site up to date is crucial for security. Recently one of our readers asked if it was possible to get email notifications for WordPress updates. By default, WordPress only shows you update notifications when you login to the admin area. In this article, we will show you how to setup email notifications for WordPress updates.


Email notifications for WordPress updates


Why and When You Need Email Notifications for WordPress Updates?


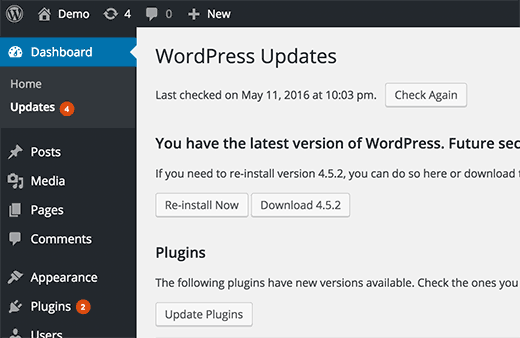
WordPress only shows you update notifications when you log into your WordPress admin area. Updates are highlighted for plugin and core updates. Theme updates are only visible on the Themes page or on the Updates page.


If you have a WordPress site, and you don’t login regularly, then you wouldn’t know when there is an update available to be installed.


WordPress Updates


One way to deal with this is by setting up automatic updates for WordPress core, plugins, and themes. It will allow your WordPress site to manage updates automatically.


Another way to manage updates is by setting up an email notification system for updates. Each time there is an update to WordPress core, plugin, or themes, you will get an email alert. You can then login to your website and install the update.


Having said that, let’s take a look at how to easily setup email notifications for WordPress updates.


Setting up Email Notifications for WordPress Updates


First thing you need to do is install and activate WP Updates Notifier plugin. For more details, see our step by step guide on how to install a WordPress plugin.


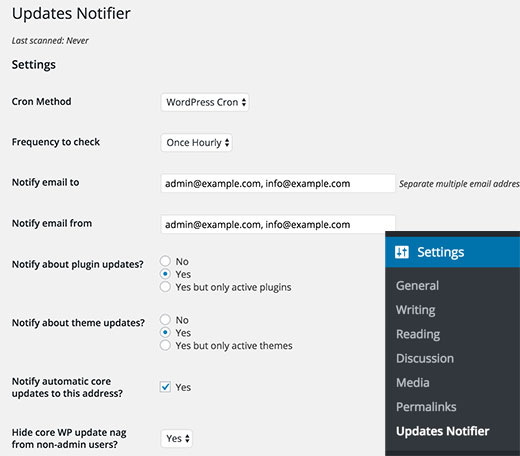
Upon activation, you need to visit Settings » Updates Notifier page to configure plugin settings.


Updates Notifier settings


First you need to select cron method. By default, it is set to WordPress, and you don’t need to change that unless you know what you are doing.


Next, you need to select how often you want to check for updates. The default is set for once every hour, but you can change that to once or twice a day.


After that enter the email addresses you want to be notified. By default, the plugin will show the email address used in your WordPress settings. You can change it to a different address or add multiple email addresses separated by a comma.


WP Updates Notifier can also notify you about plugin and theme updates. Simply check Yes next to the plugin and theme update notifications.


Once you are done, click on the ‘Save settings with test email’ button to store your changes. The plugin will store your settings and send you a test email.


If you are having trouble receiving the email, then checkout our guide on how to fix WordPress not sending email issue.


That’s all.


We hope this article helped you setup email notifications for WordPress updates. You may also want to check out our guide on keeping your WordPress content safe with BackupBuddy.


If you liked this article, then please subscribe to our YouTube Channel for WordPress video tutorials. You can also find us on Twitter and Facebook.


The post How to Setup Email Notifications for WordPress Updates appeared first on WPBeginner.


Blogger Tutorial (2/6): Setup Your First Blogspot Blog


alt="Blogger Tutorial (2/6): Setup Your First Blogspot Blog" src="http://whsr.webrevenueinc1.netdna-cdn.com/wp-content/uploads/2015/04/default-image-500x308_c.jpg" />

id="floatleft">href="https://www.blogger.com/signup.g">src="http://www.webhostingsecretrevealed.com/images/2009/0824-1.jpg" alt="Blogger Signup" border="0" />

So you’ve decided to pursue further, GREAT! In the href="http://www.webhostingsecretrevealed.com/blog-hosting/blogger-tutorial-16-introduction-getting-started/">last article, we touched a little on Blogger introduction and also its history. Some pros and cons on using Blogger were also deliberately discussed. Today, we’re gonna register for a Blogger account! I hope you’re as excited as I am.

Just click this button to start registering for an account

The whole registration process is really simple and can be divided into three sections namely:

  1. Create Account
  2. Name Blog
  3. Choose Template

Step 1: Create A Google Account

In [Create Account], instead of creating an account solely for Blogger, you will be registering for a Google Account. This grand account enables you to access many Google services like Google Calender, Googler Reader, and many more. Please understand that this is not an option. You can’t just use your own e-mail account (hotmail, yahoo, etc) as the main user identification for your blog. So, if you already have a Google Account, e.g. Gmail, then great! You could log in to your account first before returning again to the Blogger registration page.

Step 2: Naming Your Blog

[Name Blog] is a very important step of the registration process so pay a little more attention here:

id="right">src="http://www.webhostingsecretrevealed.com/images/2009/0921-1.jpg" alt="Blog registration at Blogspot" border="0" />

Blog Title

“Blog title”, like the name implies, is the title of your blog. This title will appear at the top of your reader’s web browser whenever he/she visits your blog. You may put anything relevant here and it is not constrained to limited characters so it is okay to put “My Little Diary”, “Daily Rants”, etc here.

Blog Address

id="right">src="http://www.webhostingsecretrevealed.com/images/2009/0921-2.jpg" alt="Example of a blog title at Blogspot" border="0" />

“Blog address (URL)” is your actual address in cyberspace so you better get this right, haha! My suggestion is to be creative on this one. Something simple and easy for your readers to remember so that they could frequent your blog again. Besides having the constraint that your blog will be hosted at subdomains of blogspot.com, your URL must also only contain alphanumerical characters and the only allowable special character is hyphen (also known as dash, -). The “Check Availability” is a function for you to check whether your desired URL has already been taken up or not.

Step 3: Choose Your Blog Template

In [Choose Template], you will be given a few choices of dull standard blog templates to choose from. These are actually very basic layouts but should be adequate to cover your needs. Please choose one that you feel best represents how you want your blog to be presented. Blogger reminds us that, “you can easily change the template later, or even create your own custom template design once your blog is set up.” For me, I’ll choose “Minima” because the design looks nice and clean.

class="border" src="http://www.webhostingsecretrevealed.com/images/2009/0921-3.jpg" alt="Blog Created!" />

Congratulations! Once you click the “Start Blogging” arrow, you will be brought to a new page where you could write your first post.

But instead of starting to write straight away, let’s explore some of the Settings and Layout that are available to us to be customized.

Blog Configuration: Settings, Archive, & Page Elements

We’ll go to the Settings first. “Settings” is a place where you could customize how your blog shall “behave”. Let me show you some of the more important settings in “Settings”, haha.

id="floatright">src="http://www.webhostingsecretrevealed.com/images/2009/0921-4.jpg" alt="Blog Configuration" border="0" />

Settings – Publising

Here, you could totally change your blog’s URL if you think the current one is not suitable anymore. Again, it’s subject to availability of course.

Settings – Formatting

This is a setting to determine how many blog posts will be displayed on the main page of your blog. If your blog posts are usually long and full of pictures, it may be a wise choice to put a smaller number for this one so that your reader wouldn’t take forever to load your blog.

Settings – Comments

Comments are the feedbacks your readers leave you at the end of your blog post. Here, you could choose who are able to leave comments at your blog, where the comment form should be placed, and so on. I want to touch a little on “Comment moderation”:

Sometimes, you don’t really want comments to be shown on your blog without you first authorizing it. This is called “comment moderation”.

If you set this to “Always” and you include an e-mail address, every time a reader leaves a comment, it will not be automatically shown on your blog but will arrive at your e-mail first. You then decide to approve or reject the comment.

id="right">src="http://www.webhostingsecretrevealed.com/images/2009/0921-5.jpg" alt="Blog Archive" border="0" />

Blog Archive

Archiving is a systematically procedure for storing your blog posts. You can archive daily, weekly, or monthly.

Figure on the right is the example of an archive.

We will now proceed to “Layout”. Layout, as the name implies, is a place where you could adjust the look and feel of your blog.

Furthermore, with Blogger’s superb features, you could even customize it by just clicking and dragging. (Now that’s user-friendly!)

Page Elements and Gadgets

The most important thing I want to show you here is adding a Gadget. A gadget is a small tool that is programmed to do a specific task. With the default layout chosen, Blogger has already thrown in “Followers”, “Blog Archive”, and “About Me”.

class="border" src="http://www.webhostingsecretrevealed.com/images/2009/0921-6.jpg" alt="Blog Elements" />

How to add/remove gadgets

Try clicking and dragging them to re-arrange the positions of these gadgets. Now, click “Add a Gadget” to see what goodies we could pack into your nice little blog.

id="floatright">src="http://www.webhostingsecretrevealed.com/images/2009/0921-7.jpg" alt="Blog Elements" />

A Blog List is a list of your favourite blogs together with the links to them. Let’s add this one. Let’s see, my favourite blogs include: Xiaxue, Kennysia, and many more. Add add add!

And as you can see on the right, that’s my completed blog list.

Example: Facebook Badge

There are so many possibilities here and so many cool things to play with. You can now even add, what is referred to as “Facebook Badge” here so that your Facebook status update could also be shown on your blog!

Anytime if you would like to change your blog’s template, just go to Layout – Pick New Template to do so, simple as that.

Please feel free to play around and click “Preview” to see how the changes will really look like to you and your readers. “Clear Edits” is your Undo button and “Save” to save your changes. Good luck!

P/S: In the next session, we’ll be writing our first ever Blogger post! Please stay tuned as tips on writing a clean post, attaching a photo, embedding a video, tagging/categorizing posts and more will be shared.

About the author

id="floatright">class="alignright" src="http://www.webhostingsecretrevealed.com/images/2009/0824-5.jpg" alt="Blogger Signup" width="100" height="97" />

E-quan graduated from Technological University of Malaysia as an Electrical and Electronics Engineer.

He is now attached with an MNC specializing in power and automation technologies. In his blog (confirmcekap.blogspot.com), he describes himself as a full-time procrastinator although in reality, he is “not”. He likes 80’s music especially Cantonese pop songs. He plays the Electone and wishes to own a grand piano (amongst the many things he would like to own) soon.


Page 30 – Web Hosting Secret Revealed