Affichage des articles dont le libellé est Show. Afficher tous les articles

samedi 12 novembre 2016

How to Show Content Only to RSS Subscribers in WordPress


Do you want to add exclusive content for your RSS subscribers? You can use this bonus content as a way to encourage more users to subscribe your RSS feed. In this article, we will show you how to show content only for RSS subscribers in WordPress.


RSS Only Content for WordPress


When and Why You Need Feed Only Content in WordPress?


The best way for users to receive updates from your website is by signing up for your email list or by subscribing to your RSS feed. You can even send your WordPress posts to your email list subscribers using email services like MailChimp, Aweber, etc.


However, it is a little hard convincing users to subscribe to the RSS feed of a new website. Many site owners use a marketing tactic called ‘Content Upgrades‘ to get more subscribers.


Similarly you can offer your users bonus content if they subscribe to your RSS feed. You can quickly get a lot more subscribers by combining this with popular lead generation tools like OptinMonster.


Subscribe RSS feed via email


Having said, let’s see how you can show content only to RSS subscribers or add feed only content in WordPress.


Method 1: Adding Feed Only Content using a Plugin


This method is easier and is recommended for beginners.


First thing you need to do is install and activate the WP Kill in Feed plugin. For more details, see our step by step guide on how to install a WordPress plugin.


Upon activation, the plugin makes two new shortcodes available for you to use.


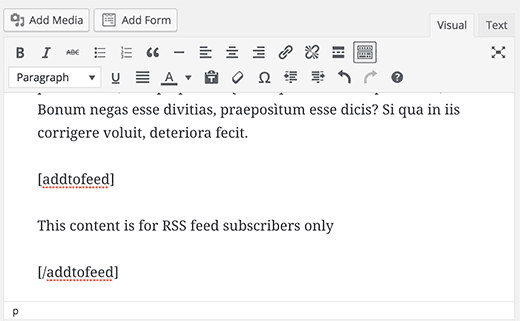
The first shortcode is [addtofeed]. It allows you to add feed only content wrapped in the shortcode. Like this:


[addtofeed]


This content is for RSS feed subscribers only


[/addtofeed]


Adding feed only shortcode in WordPress blog posts


Between the shortcodes, you can add any content you want like text, images, YouTube videos, etc. It will only be visible in the RSS feed and regular visitors of your website will not see it.


You can tell regular visitors that there is more content which will be visible to RSS feed subscribers and then add a link to your RSS feed.


Hiding Content from RSS Feed Subscribers


The plugin also allows you to hide content from RSS feed subscribers and make it visible only to users who visit your website.


Simply wrap the content in [killinfeed] [/killinfeed] shortcodes and it will not be visible to your feed subscribers. Like this:


[killinfeed]Content hidden from RSS feed subscribers [/killinfeed]


Method 2: Show Content only to RSS Feed Subscribers Using Code


This method requires you to add code in your WordPress site. If you are comfortable pasting code snippets into WordPress, then you can use this method.


Simply add this code to your theme’s functions.php file or in a site-specific plugin.


function feedonly_shortcode( $atts, $content) {
if (is_feed())
return apply_filters( 'the_content', $content );
return "";

}
add_shortcode('feedonly', 'feedonly_shortcode');

This code is basically the same as the plugin. It simply checks if user has requested a feed, then add feed only content to post content. Otherwise, it skips the feed only content.


You will need to wrap feed only content in a shortcode like this:


[feedonly]This content will only be visible to RSS feed subscribers[/feedonly]


Content inside the shortcode will only be visible to your feed subscribers. Again you can tell your site visitors that they will get to see more content if they subscribe to your RSS feed.


We hope this article helped you learn how to show content only to RSS feed subscribers in WordPress. You may also want to see our 9 extremely useful RSS tricks and snippets for WordPress.


If you liked this article, then please subscribe to our YouTube Channel for WordPress video tutorials. You can also find us on Twitter and Facebook.


The post How to Show Content Only to RSS Subscribers in WordPress appeared first on WPBeginner.


How to Show Total Number of Registered Users in WordPress


Have you ever wanted to show the total number of registered users on your WordPress site? Social proof like showing the number of registered users on your site, encourages others to register as well. In this article, we will show you how to show total number of registered users in WordPress.


How to Show Total Number of Registered Users in WordPress


Method 1: Show Registered User Count Using a WordPress Plugin


First thing you need to do is install and activate the Simple Blog Stats plugin. For more details, see our step by step guide on how to install a WordPress plugin.


Upon activation, you need to visit Settings » Simple Blog Stats page to configure plugin settings.


Settings page for Simple Blog Stats


This plugin allows you to show different stats from your WordPress site. You need to click on the shortcodes tab to expand it and then scroll down to the ‘number of users’ row.


Users shortcode settings


You will see the shortcode [sbs_users] with two text fields on both sides. These text fields contain HTML the plugin will add before and after the number of users.


By default, the shortcode will output HTML like this:


<span class="sbs-count-users">856</span>

If you are unsure, then just copy the shortcode [sbs_users] and click on the save settings button.


You can now add this shortcode to any WordPress post or page. You can also add it to a sidebar widget. If the shortcode does not work in the widget, then follow instructions in our guide on how to use shortcodes in your WordPress sidebar widget.


Method 2: Manually Show Number of Registered Users in WordPress with Code


This method requires you to add code to your WordPress site. If you haven’t done this before, then see our beginner’s guide on pasting snippets from web into WordPress.


You need to add the following code to your theme’s functions.php file or a site-specific plugin.


// Function to return user count
function wpb_user_count() {
$usercount = count_users();
$result = $usercount['total_users'];
return $result;
}
// Creating a shortcode to display user count
add_shortcode('user_count', 'wpb_user_count');

This code creates shortcode [user_count] which you can use in your WordPress posts, pages, or a sidebar widget to display the user count.


The function does not add any HTML formatting to the user count and simply returns the number. You may want to wrap the shortcode around HTML to use CSS or basic HTML formatting. For example:


<p>Join <strong>[user_count]</strong> other users who share your interest:</p>

Here is how it looked on our demo site:


Showing total number of users in WordPress widget


Note: We added a free signup button that redirected to a custom WordPress user registration page.


That’s all, we hope this article helped you learn how to show the total number of registered users in WordPress. You may also want to see our guide on how to moderate new user registrations in WordPress.


If you liked this article, then please subscribe to our YouTube Channel for WordPress video tutorials. You can also find us on Twitter and Facebook.


The post How to Show Total Number of Registered Users in WordPress appeared first on WPBeginner.


How to Show Simple Blog Stats on Your WordPress Site


Do you want to show stats like total number of posts, comments, registered users, etc to users on your site? In this article, we will show you how to show simple blog stats on your WordPress site.


Add simple blog stats in WordPress


Why Show Blog Stats on Your WordPress Site?


Building an online community can be a bit difficult for new websites. Getting more traffic and increasing time users spend on your website requires effort and patience.


Simple blog stats like the number of registered users, posts, and comments can show other users that your site is growing fast. It encourages user engagement and builds trust.


It also allows you to easily monitor your site’s growth and plan strategy. For example, if your comments are low, then you can try to get more comments on your posts. If you allow user registration, then you can do more to encourage more users to register.


Having said that, let’s take a look at how to easily show simple blog stats on your WordPress site.


Video Tutorial


If you don’t like the video or need more instructions, then continue reading.


Adding Simple Blog Stats in WordPress


First thing you need to do is install and activate the Simple Blog Stats plugin. For more details, see our step by step guide on how to install a WordPress plugin.


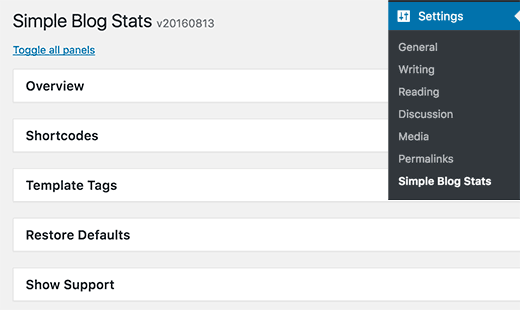
Upon activation, you need to visit Settings » Simple Blog Stats to configure plugin settings.


Simple blog stats settings page


Simple Blog Stats allows you to add blog stats using shortcodes and template tags.


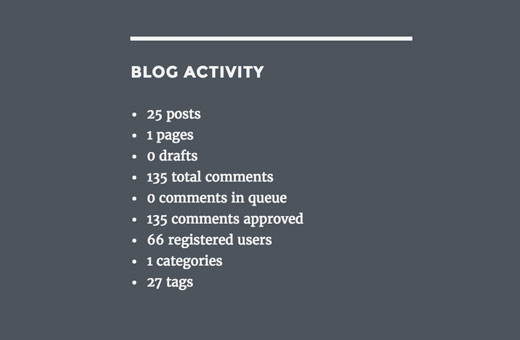
You can display all the stats by adding a single shortcode [sbs_blog_stats] in a post, page, or a sidebar widget. It will display a list of all your blog stats.


All blog stats


You can also show specific stats like total number of posts by using different shortcodes.


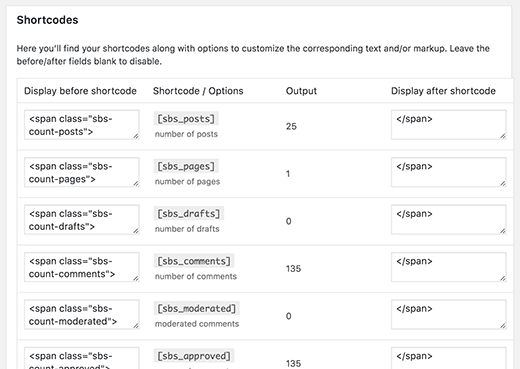
Click on the shortcodes tab to expand it, and you will see the complete list of shortcodes you can use.


Simple blog stats shortcodes


Each shortcode has a description below it which explains what information it will show. You will also see two text fields containing the HTML it will add before and after the information.


For example using the shortcode [sbs_comments] will output this HTML:


<span class="sbs-count-comments">135</span>


You can then use the .sbs-count-comments class to add custom CSS styles of your own. You can also change the <span class="sbs-count-comments"> </span> to anything you want.


Don’t forget to click on the save settings button to store your changes.


Here is a list of shortcodes offered by the plugin with description.


  • [sbs_posts] displays total number of posts on your site.

  • [sbs_pages] displays total number of pages on your site.

  • [sbs_drafts] shows total number of drafts on your site.

  • [sbs_comments] shows Total number of comments including those approved and those pending approval.

  • [sbs_moderated] shows number of comments in pending approval.

  • [sbs_approved] shows number of approved comments.

  • [sbs_users] displays total number of registered users on your site

  • [sbs_cats] shows total number of categories

  • [sbs_tags] shows total number of tags.

  • [sbs_updated] shows last updated date and time

  • [sbs_latest_posts] shows latest post

  • [sbs_latest_comments] shows latest comments

  • [sbs_blog_stats] displays all blog stats in a bulleted list.


Some of the shortcodes may display information that you probably don’t want to show like number of drafts, comments pending approval, number of categories and tags.


But you can still create a list of blog stats using individual shortcodes. These shortcodes also come in handy when you just want to show specific stats like total number of comments or total number of users on your WordPress site.


Showing user count to encourage more users to register


That’s all, we hope this article helped you learn how to show simple blog stats on your WordPress site. You may also want to see our list of 7 best analytics solutions for WordPress users.


If you liked this article, then please subscribe to our YouTube Channel for WordPress video tutorials. You can also find us on Twitter and Facebook.


The post How to Show Simple Blog Stats on Your WordPress Site appeared first on WPBeginner.


How to Show User’s Last Login Date in WordPress


Recently, one of our readers asked us how to show a user’s last login date in WordPress. You may need this if you wanted to add an author activity box on your WordPress site. In this article, we will show you how to display user’s last login date in WordPress.


Showing a user's last login date in WordPress


Video Tutorial


If you don’t like the video or need more instructions, then continue reading.


Method 1: Showing a User’s Last Login Date in WordPress Admin Area


This method is easier, but it will only show a user’s last login date inside WordPress admin area.


First thing you need to do is install and activate the WP Last Login plugin. For more details, see our step by step guide on how to install a WordPress plugin.


Upon activation, you need to visit ‘Users’ page in the admin area. You will notice a new column showing each user’s last login date.


Last login date column in WordPress admin area


At first it may show ‘never’ for all users. That’s because a user needs to login since the plugin was activated so that it could capture last login date and store it.


Method 2: Manually Show User’s Last Login Date in WordPress


This method allows you to display a user’s last login date anywhere on your WordPress site.


Simply add this code to your theme’s functions.php file or a site-specific plugin.


If you’re new to adding code, then please read this guide on pasting code from the web.


<?php
/**
* Capture user login and add it as timestamp in user meta data
*
*/

function user_last_login( $user_login, $user ) {
update_user_meta( $user->ID, 'last_login', time() );
}
add_action( 'wp_login', 'user_last_login', 10, 2 );

/**
* Display last login time
*
*/

function wpb_lastlogin() {
$last_login = get_the_author_meta('last_login');
$the_login_date = human_time_diff($last_login);
return $the_login_date;
}

/**
* Add Shortcode lastlogin
*
*/

add_shortcode('lastlogin','wpb_lastlogin');
?>

This code adds last login as a meta key. Each time a user logs in, it saves the time as a meta key value. Before you want to test the plugin, you need to logout of WordPress and then login again.


You can then display this meta key value using [lastlogin] shortcode in your WordPress posts and widgets.


If you want to show last login information in your child theme, then you can add this code:


<?php echo 'Last seen: '. do_shortcode('[lastlogin]') .' ago'; ?>

Showing user's last login information in author bio box


As you would notice that this code displays relative date and time, i.e. ‘2 hours ago’ instead of full date and time. If you want to display the full date and time, then locate this line in the code above:


$the_login_date = human_time_diff($last_login);

Now replace it with this line:


$the_login_date = date('M j, Y h:i a', $last_login);

The ‘M j, Y h:i a’ part in this code is called date and time format string. If you want to change how this code displays date and time, then check out our guide on how to change date and time format in WordPress.


We hope this article helped you learn how to show user’s last login date in WordPress. You may also want to see our guide on how to add author info box in WordPress posts.


If you liked this article, then please subscribe to our YouTube Channel for WordPress video tutorials. You can also find us on Twitter and Facebook.


The post How to Show User’s Last Login Date in WordPress appeared first on WPBeginner.