Affichage des articles dont le libellé est create. Afficher tous les articles

samedi 12 novembre 2016

How to Create a Custom Facebook Feed in WordPress


Recently, one of our users asked if we could cover how to create a custom Facebook feed in WordPress? You can display Facebook posts from your page or group on your WordPress site to improve engagement. In this article, we will show you how to create a custom Facebook feed in WordPress.


Adding a Facebook feed in WordPress


When and Why You Should Create a Custom Facebook Feed in WordPress


Facebook is the largest social media platform in the world. As a website owner, you may already be engaging with your audiences on Facebook through your Facebook page or by creating a Facebook group.


However, all the posts you make on Facebook are not visible to the people visiting your website. By adding a custom Facebook feed you can show what’s happening on your Facebook page or group to your site visitors.


This will allow more of your users to see your posts and will help you get more Facebook likes. If you are using Facebook remarketing/retargeting pixel on your website, then you can show your ads to those users on Facebook as well.


Having said that, let’s see how to add a custom Facebook feed to your WordPress site.


Adding a Custom Facebook Feed in WordPress


First thing you need to do is install and acivate the Custom Facebook Feed plugin. For more details, see our step by step guide on how to install a WordPress plugin.


Note: This free version of the plugin does not display images in shared links or status updates. For that you will need plugin’s PRO version.


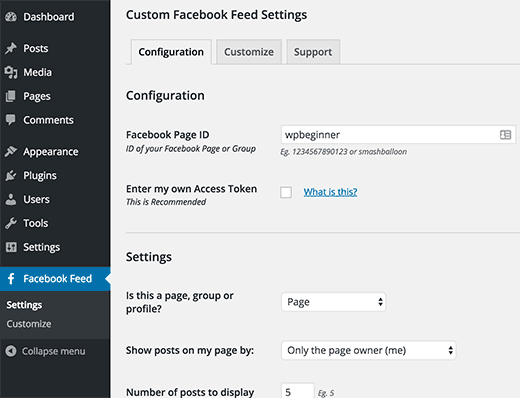
Upon activation, you need to visit Facebook Feed » Settings page to configure the plugin settings.


Custom Facebook feed settings


First you need to provide your Facebook page or group ID. If your Facebook page URL is like this:


https://www.facebook.com/your_page_name


Then you can use your_page_name as your Facebook page ID. On the other hand, if you have a Facebook page URL that looks like this:


https://www.facebook.com/pages/your_page_name/123654123654123


Then you need to use 123654123654123 as your page ID.


If you want to add a group, then you will need to enter your group ID. Simply visit Find My Facebook ID website, and enter the URL of your group in the search box. The website will reveal your Facebook group’s numeric ID.


The next thing you need to enter is an access token. The plugin will work even if you don’t add your own access token, however it is recommended to generate it and add it here.


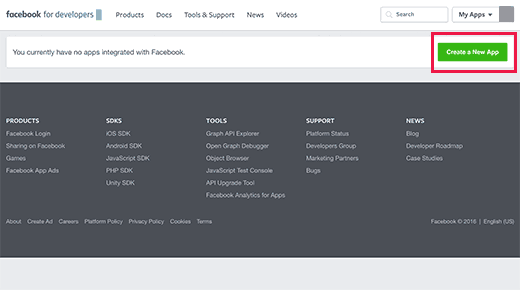
Simply visit Facebook developers website and click on the create new app button.


New Facebook app


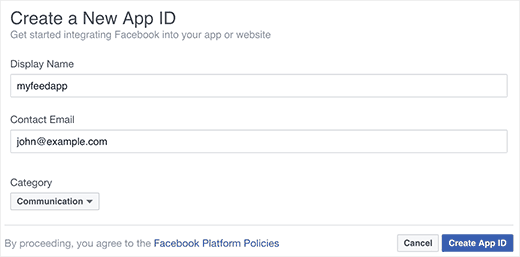
This will bring up a popup where you need to enter a name for your app. Provide an email address and then select a category for your app. Click on the ‘Create App ID’ button to continue.


Creating a new Facebook app ID


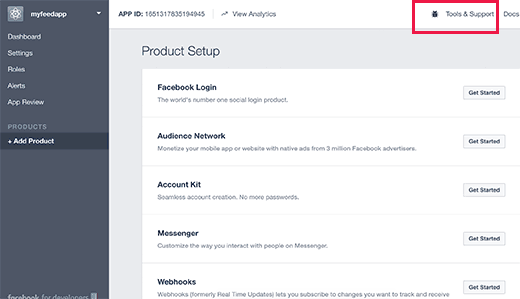
Facebook will create an app for you and will redirect you to the app’s dashboard. You need to click on Tools & Support link at the top.


Click on tools and support link at the top of your app's dashboard page


This will bring you to a page with lots of resources on how to use Facebook apps. You just need to click on ‘Access token tool’.


Access token tool


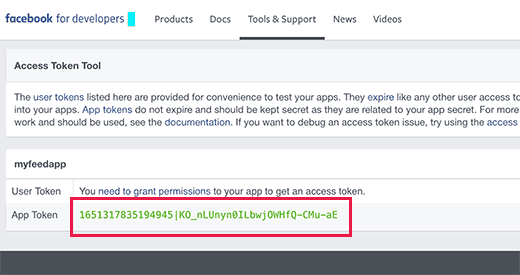
Clicking on the link will take you to a page where you will be able to see your app’s access token or app token.


Access token for your app


You can now copy and paste this access token to the custom Facebook feed plugin’s settings page.


Under the settings section on the page, you need to select whether you are showing a group or a page. You can also choose the number of posts to display, timezone, and language settings.


Don’t forget to click on the save changes button to store your plugin settings.


You can now create a new post or page or edit an existing one where you want to display your Facebook feed. In the post editor, you need to add this shortcode:


[custom-facebook-feed]


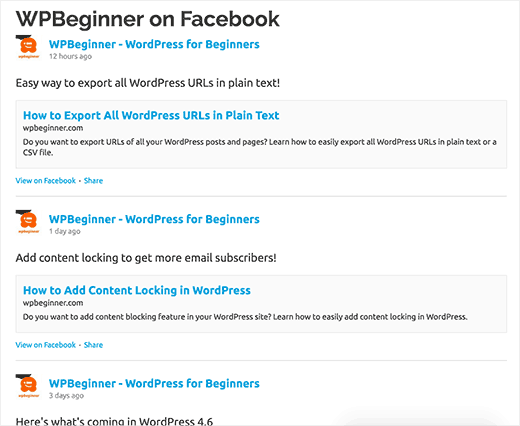
You can now save your page or post and preview it. It will fetch and display latest posts from your Facebook page or group in your WordPress page.


Preview of a custom Facebook feed in WordPress


Showing Multiple Facebook Feeds in WordPress


Let’s suppose you want to display more than one custom Facebook feed on your WordPress site. The plugin’s settings only allow you to add one page or group ID.


However, you can easily use the shortcode to display any other custom Facebook feed you want.


Simply add the shortcode like this:


[custom-facebook-feed id=wpbeginner]


The plugin’s shortcode comes with a whole range of parameters. You can visit the plugin’s website to see the complete list of parameters that you can use.


How to Customize The Appearance of Custom Facebook Feed


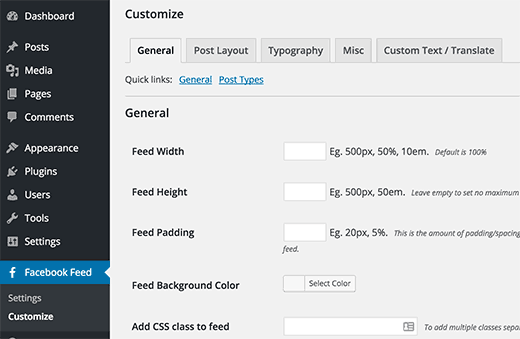
The plugin allows you customize the appearance of the custom Facebook feed on your website. Visit Facebook Feed » Customize page to edit the customization settings.


Customize appearance of Facebook feed


The customize section is divided into different tabs. Each tab has its own options, you may want to review them to customize the appearance of your custom Facebook feed.


We hope this article helped you add custom Facebook feed in WordPress. You may also want to see our list of 21 best social media monitoring tools for WordPress users.


If you liked this article, then please subscribe to our YouTube Channel for WordPress video tutorials. You can also find us on Twitter and Facebook.


The post How to Create a Custom Facebook Feed in WordPress appeared first on WPBeginner.


How to Create a Multi-Page Form in WordPress


Recently, one of our users asked us how to create a multi-page form in WordPress? Multi part forms allow you to collect more information without scaring the users away. In this article, we will show you how to create a multi-page form in WordPress.


Creating a multi-page form in WordPress


Why and When You Need Multi-Page Form in WordPress?


Forms are the easiest way to collect data and get in touch with your users. Whether it is a contact form, email capture form, or a simple survey.


However, lengthy forms are daunting for users and increases form abandonment.


To overcome this issue, user experience experts recommend multi-page forms. This way form fields are broken into sections and pages.


A multi-step checkout page example


With a progress bar on top and fewer fields on screen, users feel more at ease filling out the form. It provides a more engaging and interactive experience to your users.


Having said that, let’s see how to easily create a multi-page form in WordPress.


Creating A Multi-Page WordPress Form with WPForms


We will be using WPForms which is the most beginner friendly contact form plugin for WordPress. You will need at least the Basic license which costs .


You can use the WPForms coupon: WPB10 to get 10% discount on your purchase of any WPForms plan.


First thing you need to do is install and activate the WPForms plugin. For more details, see our step by step guide on how to install a WordPress plugin.


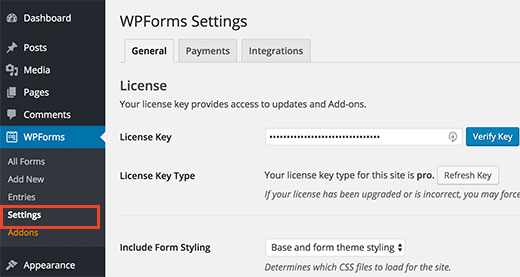
Upon activation, you will need to enter your license key. You can get this key by signing into your account on WPForms website.


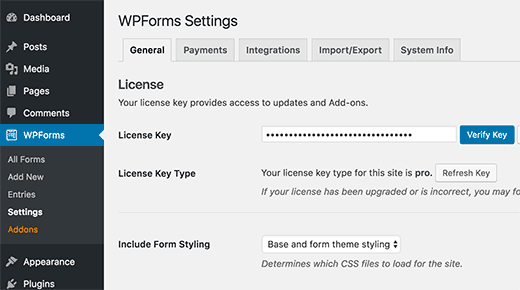
Copy the license key and then visit WPForms » Settings page on your WordPress site. Paste the license key and then click on the verify key button.


WPForms license key


After verifying your license key, you are now ready to create your first multi-page form in WordPress.


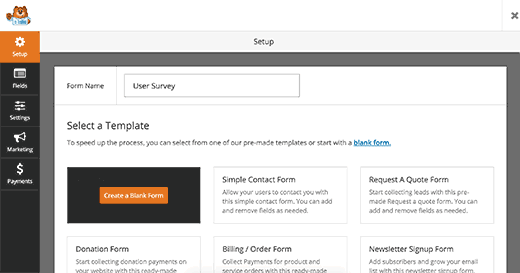
Simply go to WPForms » Add New page, and it will launch the Form Builder.


Adding a new form in WPForms


Provide a title for your form and then select one of the templates shown below. WPForms offers ready-made form to speed up the form creation process.


You can choose the one that closely matches your form requirements or choose a blank form. Clicking on a template will launch the form editor.


Form editor in WPForms


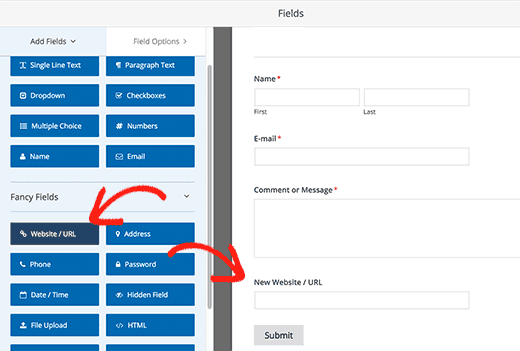
Simply click on the fields from left column to add them into your form. After that click on a field in the form to edit it. You can also drag and drop form fields.


Adding form fields in WPForms


After adding a few form fields, you are ready to add a new page to your form. Click on the Pagebreak field under fancy fields sections from the left column.


Adding pagebreak field


You will notice that WPForms will add a pagebreak marker to the bottom and a first page marker at the top of the page.


It will also push the submit button to the next page, and your first page will now have a ‘Next’ button instead.


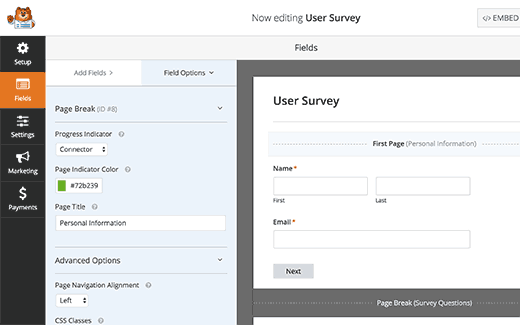
Click on the first page marker at the top to edit your multi-page form properties. In the left hand column, you can select a progress bar type. WPForms allows you to use a simple progress bar, circles, connector, or no progress indicator at all.


Edit first page marker to select progress bar type


For this tutorial, we will be using Connectors as progress bar. You can also choose the color of your page indicator. Lastly, you can provide a title for the first page.


Now you need to click on the pagebreak marker to edit its properties. Here you can provide a title for the next page. You can also edit the text to display on the Next button.


Edit page title and next button text


You can continue adding form fields after the pagebreak. If you are using the PRO version of WPForms, then you can also use conditional logic to show and hide form fields based on user responses.


After adding more fields, you can add more pagebreaks if you need.


Once you are done creating your form, click on the save button on the top right corner of the screen.


Congratulations, you have successfully created your first multi-page form.


Adding Your Multi-Page Form into WordPress Posts and Pages


WPForms makes it super easy to add forms into WordPress posts and pages.


Create a new post/page or edit an existing one. On top of the post editor, you will see an ‘Add Form’ button.


Add form button


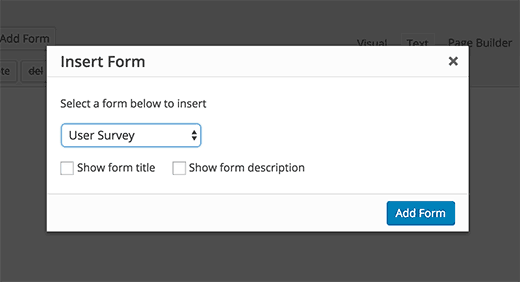
Clicking on it will bring up an insert form popup.


Select your form from the drop down list and then click Add Form button.


Select and insert your multipage form


You will notice WPForms shortcode added into your post/page. You can now save or publish this post or page.


Visit your website to see your multi-page form in action.


Preview of a paged form in WordPress


We hope this article helped you add a multi-page form in WordPress. You may also want to see our guide on how to add a contact form popup in WordPress.


If you liked this article, then please subscribe to our YouTube Channel for WordPress video tutorials. You can also find us on Twitter and Facebook.


The post How to Create a Multi-Page Form in WordPress appeared first on WPBeginner.


How to Create a Mobile-Ready Responsive WordPress Menu


Do you want to create a mobile-ready responsive WordPress menu? Mobile users have already surpassed desktop users for a lot websites. Adding a mobile responsive menu makes it easier for users to navigate your website. In this article, we will show you how to easily create a mobile-ready responsive WordPress menu.


Create mobile-responsive WordPress menu


This is an in-depth tutorial. We will show both the plugin method for beginners (no coding) and the coding method for our more advanced users.


By the end of this tutorial, you will learn how to create a slide-in mobile menu, dropdown mobile menu, and a toggle mobile menu.


Ready? Let’s get started.


Video Tutorial


If you don’t like the video or need more instructions, then continue reading.


Method 1: Add a Responsive Menu in WordPress Using a Plugin


This method is easier and recommended for beginners as it requires no custom coding.


In this method, we will be creating a hamburger menu that slides out on mobile screen.


Responsive menu plugin demo


First thing you need to do is install and activate Responsive Menu plugin. For more details, see our step by step guide on how to install a WordPress plugin.


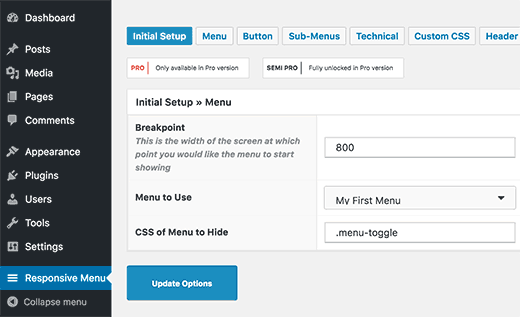
Upon activation, the plugin will add a new menu item labeled ‘Responsive Menu’ to your WordPress admin bar. Clicking on it will take you to plugin’s settings page.


Responsive menu settings


First you need to enter the width of screen at which point the plugin will start showing responsive menu. The default value is 800px which should work for most websites.


After that, you need to select the menu you would like to use for your responsive menu. If you haven’t created a menu yet, then you can create one by visiting Appearance » Menus. See our guide on how to add navigation menu in WordPress for detailed instructions.


Last option on the screen is to provide a CSS class for your current non-responsive menu. This will allow the plugin to hide your non-responsive menu on smaller screens.


Don’t forget to click on the ‘Update Options’ button to store your settings.


You can now visit your website and resize your browser screen to see the responsive menu in action.


Responsive menu plugin demo


The responsive menu plugin comes with many other options which allow you to change behavior and appearance of your responsive menu. You can explore these options on plugin’s settings page and adjust them as needed.


Method 2: Add a Drop Down Select Menu Using a Plugin


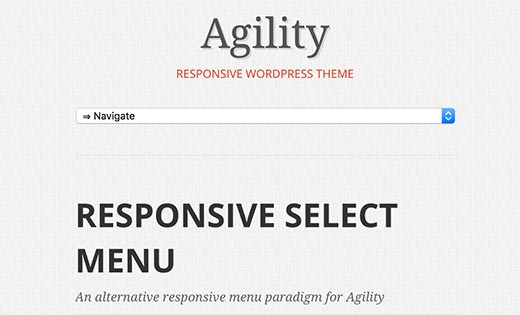
Another way to add a responsive menu is by adding a drop down select menu. This method does not require any coding skills, so it is recommended for beginners.


Responsive select menu


First thing you need to do is install and activate the Responsive Select Menu plugin. For more details, see our step by step guide on how to install a WordPress plugin.


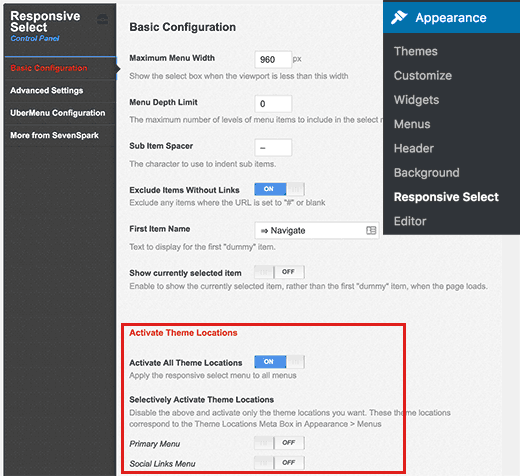
Upon activation, you need to visit Appearance » Responsive Select to configure plugin settings.


Select menu settings


You need to scroll down to ‘Activate theme locations’ section. By default, the plugin is activated on all theme locations. You can change that by selectively turning it on for specific theme locations.


Don’t forget to click on the save all settings button to store your changes.


You can now visit your website and resize browser screen to see responsive select menu in action.


Method 3: Creating Mobile Friendly Responsive Menu with Toggle Effect


One of the most common used method to display a menu on mobile screens is by using the toggle effect.


This method requires you to add custom code to your WordPress files. If you haven’t done this before, then take a look at our guide on pasting snippets from web in WordPress.


First you need to open a text editor like notepad and paste this code.


( function() {
var nav = document.getElementById( 'site-navigation' ), button, menu;
if ( ! nav ) {
return;
}

button = nav.getElementsByTagName( 'button' )[0];
menu = nav.getElementsByTagName( 'ul' )[0];
if ( ! button ) {
return;
}

// Hide button if menu is missing or empty.
if ( ! menu || ! menu.childNodes.length ) {
button.style.display = 'none';
return;
}

button.onclick = function() {
if ( -1 === menu.className.indexOf( 'nav-menu' ) ) {
menu.className = 'nav-menu';
}

if ( -1 !== button.className.indexOf( 'toggled-on' ) ) {
button.className = button.className.replace( ' toggled-on', '' );
menu.className = menu.className.replace( ' toggled-on', '' );
} else {
button.className += ' toggled-on';
menu.className += ' toggled-on';
}
};
} )(jQuery);


Now you need to save this file as navigation.js on your desktop.


Next, you need to open a FTP client to upload this file to /wp-content/themes/your-theme-dir/js/ folder on your WordPress site.


Replace your-theme-directory with your current theme’s directory. If your theme directory does not have a js folder, then you need to create it.


After uploading the JavaScript file, the next step is to make sure your WordPress site loads this JavaScript. You will need to add the following code to your theme’s functions.php file.


wp_enqueue_script( 'wpb_togglemenu', get_template_directory_uri() . '/js/navigation.js', array('jquery'), '20160909', true );

Now we need to add the navigation menu into our WordPress theme. Usually navigation menu is added into a theme’s header.php file.


<nav id="site-navigation" class="main-navigation" role="navigation">
<button class="menu-toggle">Menu</button>
<?php wp_nav_menu( array( 'theme_location' => 'primary', 'menu_class' => 'nav-menu' ) ); ?>
</nav>


We are assuming that the theme location defined by your theme is called primary. If it is not, then use the theme location defined by your WordPress theme.


The final step is to add CSS so that our menu uses the right CSS classes for toggle to work when viewed on mobile devices.


/* Navigation Menu */
.main-navigation {
margin-top: 24px;
margin-top: 1.714285714rem;
text-align: center;
}
.main-navigation li {
margin-top: 24px;
margin-top: 1.714285714rem;
font-size: 12px;
font-size: 0.857142857rem;
line-height: 1.42857143;
}
.main-navigation a {
color: #5e5e5e;
}
.main-navigation a:hover,
.main-navigation a:focus {
color: #21759b;
}
.main-navigation ul.nav-menu,
.main-navigation div.nav-menu > ul {
display: none;
}

.main-navigation ul.nav-menu.toggled-on,
.menu-toggle {
display: inline-block;
}

// CSS to use on mobile devices

@media screen and (min-width: 600px) {

.main-navigation ul.nav-menu,
.main-navigation div.nav-menu > ul {
border-bottom: 1px solid #ededed;
border-top: 1px solid #ededed;
display: inline-block !important;
text-align: left;
width: 100%;
}
.main-navigation ul {
margin: 0;
text-indent: 0;
}
.main-navigation li a,
.main-navigation li {
display: inline-block;
text-decoration: none;
}
.main-navigation li a {
border-bottom: 0;
color: #6a6a6a;
line-height: 3.692307692;
text-transform: uppercase;
white-space: nowrap;
}
.main-navigation li a:hover,
.main-navigation li a:focus {
color: #000;
}
.main-navigation li {
margin: 0 40px 0 0;
margin: 0 2.857142857rem 0 0;
position: relative;
}
.main-navigation li ul {
margin: 0;
padding: 0;
position: absolute;
top: 100%;
z-index: 1;
height: 1px;
width: 1px;
overflow: hidden;
clip: rect(1px, 1px, 1px, 1px);
}
.main-navigation li ul ul {
top: 0;
left: 100%;
}
.main-navigation ul li:hover > ul,
.main-navigation ul li:focus > ul,
.main-navigation .focus > ul {
border-left: 0;
clip: inherit;
overflow: inherit;
height: inherit;
width: inherit;
}
.main-navigation li ul li a {
background: #efefef;
border-bottom: 1px solid #ededed;
display: block;
font-size: 11px;
font-size: 0.785714286rem;
line-height: 2.181818182;
padding: 8px 10px;
padding: 0.571428571rem 0.714285714rem;
width: 180px;
width: 12.85714286rem;
white-space: normal;
}
.main-navigation li ul li a:hover,
.main-navigation li ul li a:focus {
background: #e3e3e3;
color: #444;
}
.main-navigation .current-menu-item > a,
.main-navigation .current-menu-ancestor > a,
.main-navigation .current_page_item > a,
.main-navigation .current_page_ancestor > a {
color: #636363;
font-weight: bold;
}
.menu-toggle {
display: none;
}

}

You can now visit your website and resize your browser screen to see your responsive toggle menu in action.


Toggle menu preview


Troubleshooting: Depending on your WordPress theme you may need to adjust the CSS. Use inspect element tool to figure out the CSS conflicts with your theme.


Method 4: Add a Slide-In Mobile Menu in WordPress


Another common technique to add a mobile menu is by using a slide-in panel menu (as shown in Method 1).


Method 4 requires you to add code to your WordPress theme files, and it is just a different way of accomplishing the same results as Method 1.


First, you need to open a plain text editor like Notepad and add the following code to a blank text file.


(function($) {
$('#toggle').toggle(
function() {
$('#popout').animate({ left: 0 }, 'slow', function() {
$('#toggle').html('<img src="http://www.example.com/wp-content/themes/your-theme/images/menu.png" alt="close" />');
});
},
function() {
$('#popout').animate({ left: -250 }, 'slow', function() {
$('#toggle').html('<img src="http://www.example.com/wp-content/themes/your-theme/images/menu.png" alt="close" />');
});
}
);
})(jQuery);

Don’t forget to replace example.com with your own domain name and your-theme with your actual theme directory. Save this file as slidepanel.js to your desktop.


Now you will need an image which will be used as a menu icon. A hamburger icon is most commonly used as the menu icon. You will find tons of such images from different websites. We will be using the menu icon from Google Material Icons library.


Once you find an image that you want to use, save it as menu.png.


Next, you need to open a FTP client client and upload slidepanel.js file to /wp-content/your-theme/js/ folder.


If your theme directory does not have the JS folder, then you need to create tit and then upload your file.


After that, you need to upload menu.png file to /wp-content/themes/your-theme/images/ folder.


Once the files are uploaded, we need to make sure that your theme loads the JavaScript file you just added. We will achieve this by enqueuing the JavaScript file.


Add this code to your theme’s functions.php file.


wp_enqueue_script( 'wpb_slidepanel', get_template_directory_uri() . '/js/slidepanel.js', array('jquery'), '20160909', true );

Now we need to add the actual code in your theme’s header.php file to display the navigation menu. You should look for code similar to this:


<?php wp_nav_menu( array( 'theme_location' => 'primary', 'menu_class' => 'nav-menu' ) ); ?>

You want to wrap existing navigation menu with the HTML code to display your slide panel menu on smaller screens.


<div id="toggle">
<img src="http://www.example.com/wp-content/themes/your-theme/images/menu.png" alt="Show" /></div>
<div id="popout">
<?php wp_nav_menu( array( 'theme_location' => 'primary', 'menu_class' => 'nav-menu' ) ); ?>
</div>

Notice that your theme’s navigation menu is still there. We have just wrapped it around HTML that we need to trigger slidepanel menu.


Last step is to add CSS to hide the menu image icon on larger screens. You will also need to adjust the position of the menu icon.


Here is a sample CSS that you can use as an starting point:


@media screen and (min-width: 769px) {
#toggle {
display:none;
}

}

@media screen and (max-width: 768px) {
#popout {
position: fixed;
height: 100%;
width: 250px;
background: rgb(25, 25, 25);
background: rgba(25, 25, 25, .9);
color: white;
top: 0px;
left: -250px;
overflow:auto;
}


#toggle {
float: right;
position: fixed;
top: 60px;
right: 45px;
width: 28px;
height: 24px;

}

.nav-menu li {
border-bottom:1px solid #eee;
padding:20px;
width:100%;
}

.nav-menu li:hover {
background:#CCC;
}

.nav-menu li a {
color:#FFF;
text-decoration:none;
width:100%;
}
}

Depending on your WordPress theme, you may need to adjust the CSS to avoid conflicts.


Here is how it looked on our demo website:


Responsive slide-in menu in WordPress


We hope this article helped you learn how to create a mobile-ready responsive WordPress menu. You may also want to see our guide on how to add a fullscreen responsive menu in WordPress


If you liked this article, then please subscribe to our YouTube Channel for WordPress video tutorials. You can also find us on Twitter and Facebook.


The post How to Create a Mobile-Ready Responsive WordPress Menu appeared first on WPBeginner.


How to Create a Custom User Registration Form in WordPress


Do you want to create a custom front-end user registration form in WordPress? The default WordPress user registration form shows WordPress branding and does not match your site’s theme. In this article, we will show you how to create a custom user registration form in WordPress.


How to Create a Custom User Registration Form in WordPress


Why Add a Custom User Registration Form in WordPress


The default WordPress user registration page shows WordPress branding and logo. It does not match the rest of your WordPress site.


Creating a custom user registration form allows you to add the registration form on any page of your WordPress site. It helps you deliver a more consistent user experience during the registration process.


A custom user registration form also allows you to redirect users upon registration. You can also display additional user profile fields, combine it with custom front-end login form, and connect it with your email marketing service.


Having said that, let’s take a look at how to create a custom user registration form in WordPress.


Creating a Custom User Registration Form in WordPress


First thing you need to do is install and activate the WPForms – WordPress forms plugin. For more details, see our step by step guide on how to install a WordPress plugin.


WPForms is the best WordPress contact form plugin that allows you to create all type of forms in WordPress.


You will need at least the Pro plan to get access to their user registration addon.


You can use our WPForms coupon: WPB10 to get 10% discount on your purchase of any WPForms plan.


Upon activation, you need to visit WPForms » Settings page to enter your WPForms license key. You can get this key from your account on WPForms website.


Add your WPForms License key


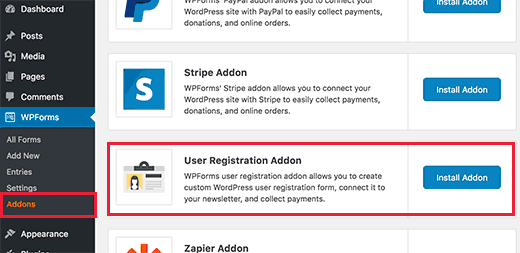
Next, you need to visit WPForms » Addons page. Click on the ‘Install Addon’ button next to ‘User Registration Addon’.


Install user registration addon


WPForms will now download and install the User Registration Addon. You will need to click on the ‘Activate’ button to start using the addon.


Activate user registration addon


You are now ready to create your custom user registration form.


You need to visit WPForms » Add New to launch the WPForms Builder.


First, you need to enter a name for your form and then select ‘User Registration Form’ as template.


Form builder setup


WPForms will now create a simple registration form for you. This sample form will have following WordPress user registration fields added by default.


  • Name – First and last name

  • Username

  • Email

  • Password

  • Short bio


You can add more fields from the left panel. You can also drag fields to rearrange their order.


Adding Custom Fields in Your Custom User Registration Form


WPForms also allows you to connect custom user profile fields to your user registration form.


To do this, you will need to add additional user profile fields to your WordPress site. The easiest way to do this is by using a plugin.


In this example, we are using User Meta Manager plugin. However, the field mapping feature of WPForms works with any plugin that uses standard WordPress custom fields to add and store user meta data.


First thing you need to do is install and activate the User Meta Manager plugin. For more details, see our step by step guide on how to install a WordPress plugin.


Upon activation, you need to visit Users » User Meta Manager page and click on Add Custom Meta button to continue.


Adding custom user meta to user profiles in WordPress


First you need to enter a key. This key is how the custom user profile field will be recognized internally.


Next you need to choose a field type. In this example, we are using a URL field to add Facebook profile URL. Under ‘Label’, you need to enter the label that will be visible to users when filling this field.


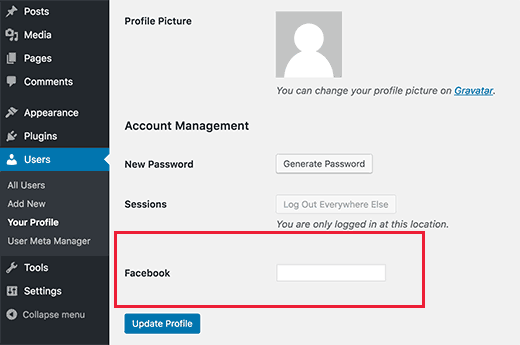
Click on the Submit button to add the custom meta field. You can now visit Users » Your Profile page to see the field in action.


A custom user profile field to add Facebook profile URL


Now that we have created a custom user profile field, let’s add it to the custom user registration form in WPForms and then map it.


You will need to visit WPForms » All Forms page to edit your custom user registration form or create a new one.


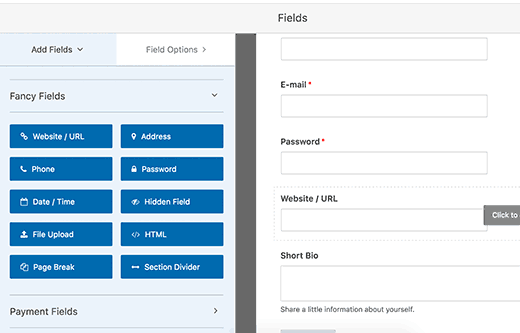
After that click on a field from the left panel to add it to your form. In this example, we are adding a website/URL field to our form.


Adding fields


The website / URL field will now appear in your form preview. You need to click on the field and WPForms will show its properties in the left panel.


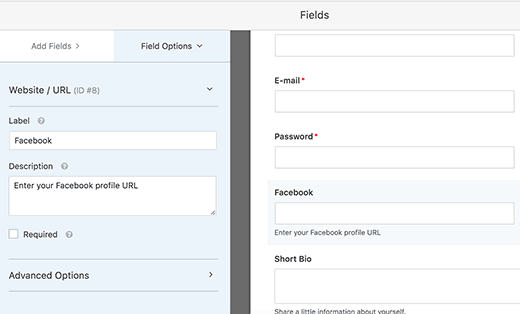
We need to change the label from Website/URL to Facebook Profile URL. You can also add a description for the field.


Edit field


Don’t forget to click on the Save button at the top right corner of the screen to save your form.


Next, you need to click on the Settings button for advanced form settings and field mapping. On the Settings page, click on the User Registration tab.


WPForms will now show your form fields and a drop down menu below them to select the WordPress registration field to map it with.


You will notice that WPForms will automatically map your default fields like Name, Email, Password, etc. You can also select a page where you want users to be redirected to once they submit the form.


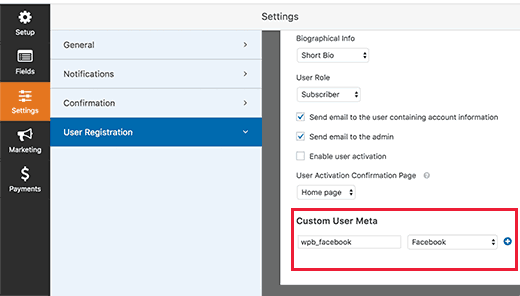
You will need to scroll down to the ‘Custom User Meta’ section. Here you can enter the custom meta key you created earlier and then select the form field you want to map it with.


Mapping custom fields


Don’t forget to click on the Save button on the top right corner of the screen to save your settings.


Adding Your Custom User Registration form in WordPress


WPForms makes it super simple to add forms into your WordPress posts, pages, and sidebar widgets.


You need to create a new post/page or edit an existing one. On the post edit screen, you will notice the new WPForms button.


Adding a form in WordPress posts or page


Clicking on it will bring up a popup. You need to select your form from the drop down menu and then click on the Add Form button.


You will notice the WPForms shortcode will appear in your post’s content editor. You can now publish or save your post/page and then preview your form.


Previewing custom user registration form


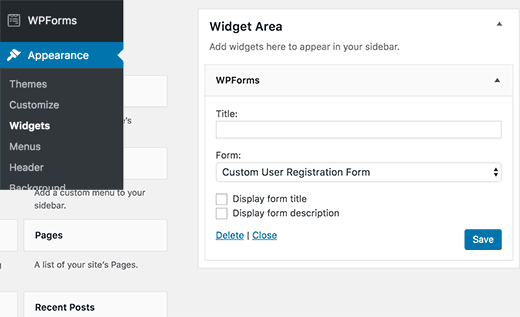
WPForms also allows you to add your custom user registration form in your sidebar. Visit Appearance » Widgets page and add WPForm widget to a sidebar.


Add custom user registration form to sidebar in WordPress


You need to select the form you want to show from the drop down menu in the widget settings. Don’t forget to click on the save button to store your widget settings.


That’s all, you can now visit your website to see your custom user registration form in action.


Custom registration form in sidebar


We hope this article helped you learn how to easily add a custom user registration form in WordPress. You may also want to see our list of 10 WordPress plugins that will quickly help you get more traffic.


If you liked this article, then please subscribe to our YouTube Channel for WordPress video tutorials. You can also find us on Twitter and Facebook.


The post How to Create a Custom User Registration Form in WordPress appeared first on WPBeginner.


How to Create a Multilingual WordPress Site with WPML


Do you want to make your website available in multiple languages? By default, WordPress does not come with features required to create a proper multilingual site. That’s why in this tutorial, we will show you how to create a multilingual WordPress site with the popular WPML plugin.


Creating multilingual WordPress site with WPML


Why Create a Multilingual WordPress Site Using WPML?


You can use WordPress in any language that you want. It is super easy to create a website in any single language.


Most popular WordPress themes and plugins are also translation ready which makes it easy for anyone in the world to start a WordPress site in their language.


However, by default WordPress can support only one language at a time. What if you wanted to use multiple languages on a site to attact a much wider audience?


Governments, international businesses, and educational institutes often need to offer their website in multiple languages. While machine translations like Google Translate is an option, it’s often not acceptable for most professional organization.


One way to offer multiple language options is to install WordPress in subdomains for each language. This is a lot of hassle, as you will have to manage updates, and backup all those installations.


WPML (WordPress Multilingual Plugin) solves this problem by allowing your website to become multilingual. You can use the same WordPress installation to create content into many different languages.


It offers an easy to use interface for managing translations. It also adds language switching options for your users.


Having said that, let’s see how you can create a multilingual WordPress website with WPML in minutes.


Creating a Multilingual WordPress Site with WPML


First thing you need to do is install and activate the WPML (WordPress Multi-language) plugin. For more details, see our step by step guide on how to install a WordPress plugin.


Note: WPML is a paid plugin, but it’s by far the most comprehensive option. There is a reason why over 400,000 websites use WPML for creating a multilingual WordPress site.


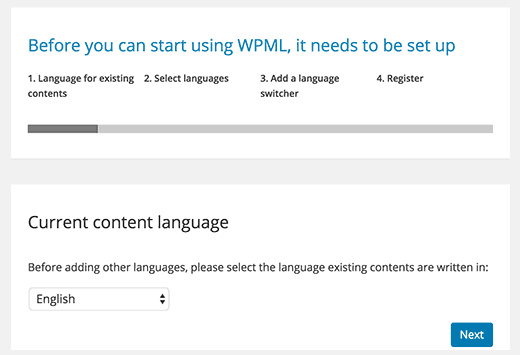
Upon activation, the plugin will add a new menu item labeled ‘WPML’ in your WordPress menu. Clicking on it for the first time will take you to plugin’s settings wizard.


WPML Setup - Choose primary language


WPML will automatically detect your WordPress site’s language. You can change it here now if you want.


Click on the next button to continue.


On the next screen, you will be asked to select the languages you want to enable on your site. Simply select the languages from the list that you want to add to your site.


Select languages


You can always add or remove languages later if you need. After selecting your site languages, click on the next button.


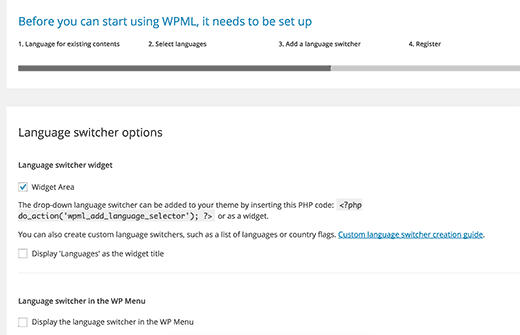
Now you will be asked to add a language switcher to your site. This language switcher will allow your users to choose a language to view content in their preferred language.


Language switcher


WPML allows you to automatically add content switcher as a sidebar widget, in your navigation menu, or display as a plain list.


Additionally, you can also choose to select flags or text for language switcher. Once you have made the choice, click on the next button.


As the final step, you will be asked to enter your site key. If you have not generated one yet, then you can click on ‘Generate a key for this site’ button.


Register site key to receive automatic updates


This will take you to WPML website, where you will be asked to add the site you are coming from to your WPML account.


Once your site is added, you can click on it to get to your site key. Copy and paste this key into your WordPress site.


That’s all you have successfully finished the WPML setup wizard. You can now click on the Finish button to exit the setup.


Adding Multilingual Content into WordPress with WPML


WPML makes it really easy to translate every area of your WordPress site into multiple languages.


You will be able to easily translate your WordPress posts, pages, tags, categories, and themes into as many languages as you like.


Adding Multilingual Posts and Pages


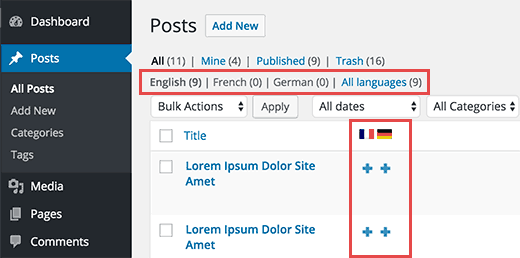
Simply click on the posts menu to view your existing posts. You will notice the languages columns next to your post titles.


Adding translation for posts


WPML assumes that your existing content is in your site’s primary language. It will show Add buttons for each language next to your posts. Click on the add button under a language to translate a post.


You can also manage translations by editing a post.


On the post edit screen, you will notice the new ‘Language’ meta box to manage translations.


managing translations from post edit screen in WordPress


You can add translated content yourself or you can add users and authors to your WordPress site and have them translate your content for you.


WPML also offers a better way to manage users who work as translators on your website. If you purchase their Multilingual CMS Plan, then you can use their translation management module.


Translation management module allows you to add users as translators regardless of what role they have on your WordPress site. You can even add subscribers as translators.


Adding translators using translator management module


Instead of editing posts, these translators will be able to add translations directly in WPML.


Adding Translations for Categories and Tags


WPML allows you to easily translate categories and tags, or any other custom taxonomies that you may be using.


Visit WPML » Taxonomy Translation and load the custom taxonomies you want to translate.


For example: in this screenshot we selected categories, and it displayed all categories from our example site.


Taxonomy translate


Click on the add button next to the taxonomy term to add the translation.


Translating Navigation Menus


WordPress comes with a robust navigation menu system. WPML allows you to translate it just like you would translate posts or taxonomies.


Visit Appearance » Menus page on your site. If you have more than one menus, then select the menu you want to translate.


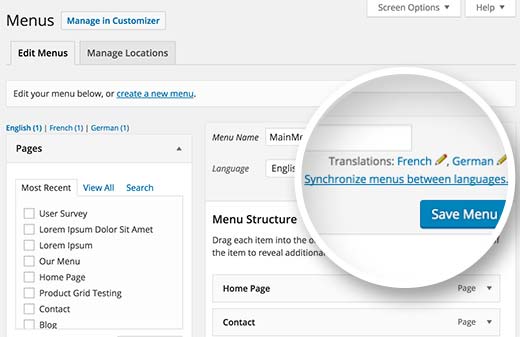
In the right hand column, you will see your menu with links to translate into other languages enabled on your site.


Translate Menus in multilingual WordPress


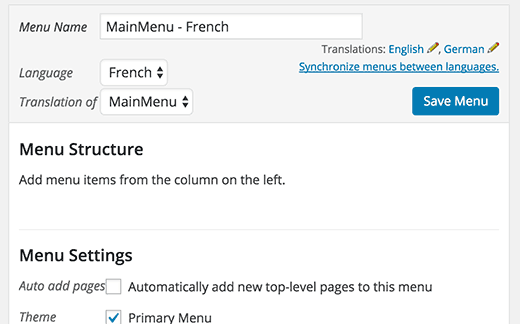
Clicking on a language will create a new menu for that language. You will need to add the same menu items as in your primary language menu.


Translating a navigation menu


If you have your posts and pages in navigation menus, then you will first need to translate them. After that you can add them from the tabs on the left in edit menu screens.


Don’t forget to click on the save button to save your menu.


Translating Themes, Plugins, & Other Text with WPML


WPML multilingual CMS allows you to choose between official translations of themes and plugins or use its own string translator.


Go to WPML » Themes and plugins localization page.

Load locale files for themes and plugins


By default, you will see ‘Don’t use String Translation to translate the theme and plugins’ checked. Below it, you will see another checkbox to automatically load the theme’s .mo file using ‘load_theme_textdomain’.


You can check this box to see if there are any translation files available for your theme. This works only with themes downloaded from the WordPress.org theme directory.


This setting doesn’t work very well for most websites. Not all WordPress themes and plugins have translations available. In some cases the translations are not good or incomplete.


We recommend using WPML’s String Translation module to properly translate your theme and plugins for your own site.


This module will also allow you to translate custom fields, widgets, and other translatable strings generated by WordPress.


We hope this article helped you learn how to create a WordPress multilingual site with WPML. You may also want to see our list of 40 useful tools to manage and grow your WordPress blog.


If you liked this article, then please subscribe to our YouTube Channel for WordPress video tutorials. You can also find us on Twitter and Facebook.


The post How to Create a Multilingual WordPress Site with WPML appeared first on WPBeginner.