Affichage des articles dont le libellé est Optimize. Afficher tous les articles

samedi 12 novembre 2016

12 Tips to Optimize Your WordPress RSS Feed


Do you want to optimize your WordPress RSS feed? RSS feeds provide an easy way for your users to subscribe to your content. However, not many beginners know about how to make the most out of WordPress RSS feeds. In this article, we will share 12 tips on how to optimize your WordPress RSS feeds and boost your subscriptions.


Optimize Your WordPress RSS Feed


1. Optimize Your WordPress RSS Feed for Feedly


Feedly has quickly become the most popular feed reader after the demise of Google Reader. Optimizing your WordPress RSS feed for Feedly will help you get discovered on Feedly and offer a better user experience to your subscribers.


First you need to install and activate the Optimize Your Feed for Feedly plugin. For more details, see our step by step guide on how to install a WordPress plugin.


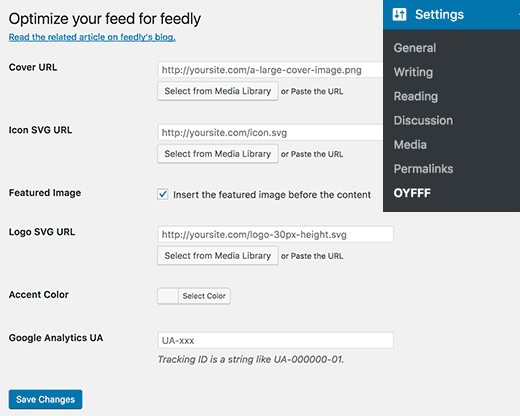
Upon activation you need to visit Settings » OYFFF page in your WordPress admin area to configure the plugin settings.


Optimize WordPress feed for Feedly settings


In the first option, you need to provide a large image to be used as the cover image for your website. After that you need to provide an SVG image to be used as your site’s icon.


If you have your logo image in PNG or JPEG, then you can use this online tool to convert PNG into SVG.


If you get a file type not allowed error during the upload, then you need to enable SVG upload in WordPress. Simply add this code to your theme’s functions.php file or in a site-specific plugin.


function cc_mime_types($mimes) {
$mimes['svg'] = 'image/svg+xml';
return $mimes;
}
add_filter('upload_mimes', 'cc_mime_types');

Next, you need to check the box for featured image option. However, if you are using custom code to add featured images into your RSS feed, then you will need to remove that code. Otherwise, feature images may appear twice in your feed.


After that you need to provide an SVG file to be used as a logo. Again, you can use your site’s logo for that just make sure that it has a fixed height (30px).


You can also choose an accent color which will be used on Feedly when displaying your site as a source.


Lastly, you can add your Google Analytics tracking ID. You can find this ID from your Google Analytics dashboard. It would look something like UA-XXXXXXX-X.


Don’t forget to click on the save changes button to store your settings.


2. Add a Follow on Feedly Button to Your Posts


You may also want to add a follow on Feedly button to your website. This will allow your users to directly subscribe to your RSS feed in Feedly.


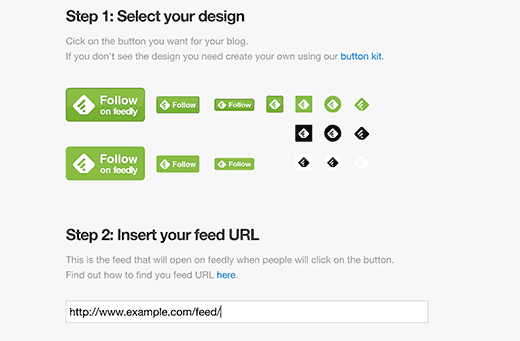
First you need to visit the Feedly Button Factory website and click on a button design that you want to add. After that enter your RSS feed URL which looks like this:


http://yoursite.com/feed/


Follow on Feedly button


Feedly will generate a code snippet for you. You need to copy this code snippet and go to Appearance » Widgets page in your WordPress admin area.


After that, simply add a text widget to your sidebar and then paste the code snippet inside it.


3. Show Summary Instead of Full Article in RSS Feed


Showing your full article in RSS feed allows users to read it in their feed reader. This can affect your pageviews, advertisement revenue, and conversion rates.


Some publishers prefer to show summary instead requiring users to visit their website.


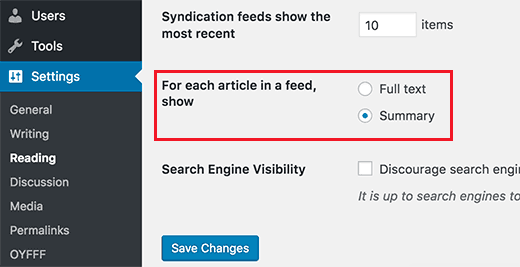
WordPress comes with a built-in solution. Simply visit Settings » Reading page in your WordPress admin and scroll down to ‘For each article in a feed, show’ option.


Show summary in RSS feed


Next, simply click on Summary to select it and then click on the save changes button to store your settings.


On the same settings page, you can also control the number of posts to display in your RSS feed. See our article on how to limit the number of posts displayed in WordPress RSS feed for detailed instructions.


4. Add Featured Image with WordPress Posts in RSS Feed


By default, WordPress does not add your post featured images in the RSS feed. Some feed readers like Feedly try to automatically use the first image in the article as featured image.


If you are not using the Optimize Feed for Feedly plugin, then you can use this method to add featured image to your RSS feed.


You will need to add this code to your theme’s functions.php file or in a site-specific plugin.


function rss_post_thumbnail($content) {
global $post;
if(has_post_thumbnail($post->ID)) {
$content = '<p>' . get_the_post_thumbnail($post->ID) .
'</p>' . get_the_content();
}
return $content;
}
add_filter('the_excerpt_rss', 'rss_post_thumbnail');
add_filter('the_content_feed', 'rss_post_thumbnail');

This code simply adds your featured image inside a paragraph just before the post content.


5. Add Content Before or After WordPress Posts in RSS Feeds


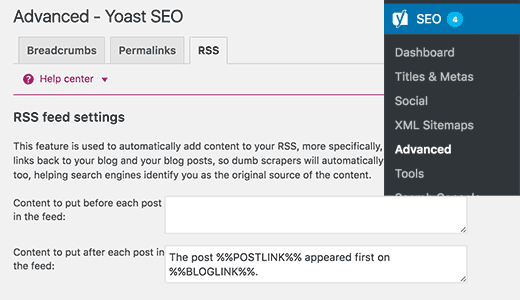
Want to add some custom content at the end or beginning of each item in your RSS feed? If you are already using the Yoast SEO plugin, then you are in luck. Head over to SEO » Advanced page and then click on the RSS tab.


Add custom content before or after each post in feed


Here you will see two text areas to add content before and after posts in your WordPress RSS feed. You will notice that Yoast SEO automatically adds ‘The post %%POSTLINK%% appeared first on %%BLOGLINK%%.’ after each post.


This protects you against content scrapers because now Google will always know that your site was the original source.


6. Add Custom Post Types to Your RSS Feed


Many WordPress sites use custom post types for content like recipes, reviews, etc. Each custom post type has its own RSS feed in WordPress. However, WordPress only shows ‘Posts’ in the main RSS feed.


You can add the following code to your theme’s functions.php file or a site-specific plugin to display custom post types in the main RSS feed.


function myfeed_request($qv) {
if (isset($qv['feed']) && !isset($qv['post_type']))
$qv['post_type'] = array('post', 'books', 'movies');
return $qv;
}
add_filter('request', 'myfeed_request');

In this code, we have added two custom post types books and movies to the main RSS feed. Don’t forget to replace books and movies with your own custom post types.


For more detailed instructions see our guide on how to add custom post types to your main WordPress RSS feed.


7. Allow Subscribe to RSS Feed via Email


Not all your users know or want to use a feed reader to subscribe. Many users prefer to subscribe by email. You need to make sure that those users can easily sign up to receive your posts in their inbox.


Email subscription form on List25 website


There are many ways to add email subscription to your WordPress site. Most popular email marketing service providers offer RSS to email list option. This allows them to check your RSS feed for new content, and email that new content to your subscribers.


For more detailed instructions, take a look at our guide on how to add email subscriptions to your WordPress blog.


8. Allow Users to Subscribe to Categories in WordPress


Each category on your WordPress site has a separate RSS feed of its own. This allows your users to subscribe to specific categories that they are interested in.


However, most users are unaware that they can subscribe to specific categories. You can make it easier for users by adding links to category RSS feeds with subscription buttons.


Category subscription choices on WPBeginner


For more detailed instructions, see our guide on how to allow users to subscribe categories in WordPress.


9. Allow Users to Subscribe to Authors in WordPress


Subscribe to author RSS feed


If you run a multi-author blog, then your users may want to subscribe to their favorite authors. Just like categories and custom post types, each author in WordPress has a separate RSS feed.


This RSS feed is located at a URL like this:


http://www.example.com/author/tom/feed/


You can use this URL format to add links to author RSS feed in the author bio section.


For more ways to add author RSS feed, follow instructions in our guide on how to allow users to subscribe to authors in WordPress.


10. Show or Hide Content From RSS Feed Subscribers


Want to show bonus content to your RSS feed subscribers only? Some smart site owners use this for encouraging users to subscribe to their RSS feed.


On the other hand, some site owners may want to hide part of their content from RSS readers. This allows them to encourage users to visit their website.


First you need to install and activate the WP Kill in Feed plugin. For more details, see our step by step guide on how to install a WordPress plugin.


Upon activation, you can use the shortcode [addtofeed] to add feed only content, like this:


[addtofeed]
This content is for RSS feed subscribers only
[/addtofeed]


You can also use [killinfeed] shortcode to hide content from RSS feed.


[killinfeed]Content hidden from RSS feed subscribers [/killinfeed]


For more on this topic, check out our article on how to show content only to RSS feed subscribers in WordPress.


11. Add Social Buttons to Your WordPress RSS Feed


Share buttons in RSS feed


Many modern feed readers like Feedly, allow users to share articles from feeds they have subscribed. However, other RSS readers don’t have social sharing features or they are not very noticeable.


You can add your own social media icons to your WordPress RSS feed. Here is how:


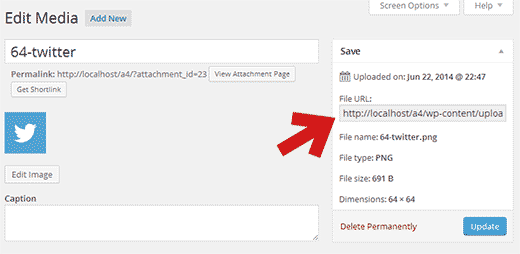
First you will need to create image icons you want to use as buttons. For this tutorial we added icons for Facebook and Twitter to our demo site from Media » Add New page.


After uploading your icon image files, you need to copy their location and save it in a text editor like Notepad.


Media file location


Next you need to add this code to your theme’s functions.php file or a site-specific plugin.


// add custom feed content
function wpb_add_feed_content($content) {

// Check if a feed is requested
if(is_feed()) {

// Encoding post link for sharing
$permalink_encoded = urlencode(get_permalink());

// Getting post title for the tweet
$post_title = get_the_title();

// Content you want to display below each post
// This is where we will add our icons

$content .= '<p>
<a href="http://www.facebook.com/sharer/sharer.php?u=' . $permalink_encoded . '" title="Share on Facebook"><img src="Facebook icon file url goes here" title="Share on Facebook" alt="Share on Facebook" width="64px" height="64px" /></a>

<a href="http://www.twitter.com/share?&text='. $post_title . '&amp;url=' . $permalink_encoded . '" title="Share on Twitter"><img src="Facebook icon file url goes here" title="Share on Twitter" alt="Share on Twitter" width="64px" height="64px" /></a>
</p>';
}

return $content;
}

add_filter('the_excerpt_rss', 'wpb_add_feed_content');
add_filter('the_content', 'wpb_add_feed_content');

Don’t forget to replace the src= attribute in the <img> tag with the URLs of your own Facebook and Twitter icons.


You can now view your RSS feed in a feed reader, and you will see social sharing buttons for Facebook and Twitter.


See our article on how to add social buttons to your WordPress RSS feed for more detailed instructions.


12. Delay Posts from Appearing in RSS Feed


RSS feeds are often used by content scrapers to automatically fetch and display your content on their websites. If you have a new website with low authority, then these content scraping websites can beat you in search results.


One possible solution to combat this issue is by delaying posts from appearing in your RSS feed. This gives search engines time to crawl and index your content before it appears elsewhere.


You will need to add the following code to your WordPress theme’s functions.php file or a site-specific plugin.


function publish_later_on_feed($where) {

global $wpdb;

if ( is_feed() ) {
// timestamp in WP-format
$now = gmdate('Y-m-d H:i:s');

// value for wait; + device
$wait = '10'; // integer

// http://dev.mysql.com/doc/refman/5.0/en/date-and-time-functions.html#function_timestampdiff
$device = 'MINUTE'; //MINUTE, HOUR, DAY, WEEK, MONTH, YEAR

// add SQL-sytax to default $where
$where .= " AND TIMESTAMPDIFF($device, $wpdb->posts.post_date_gmt, '$now') > $wait ";
}
return $where;
}

add_filter('posts_where', 'publish_later_on_feed');

This code adds a 10 minute delay before posts can appear in your RSS feed. You can change it to your own needs like 60 for one hour, or 120 for two hours.


For more on this topic, you may want to take a look at our article on how to delay posts from appearing in WordPress RSS feed.


We hope this article helped you optimize your WordPress RSS feed. You may also want to see our 18 useful tricks to speed up WordPress and boost performance.


If you liked this article, then please subscribe to our YouTube Channel for WordPress video tutorials. You can also find us on Twitter and Facebook.


The post 12 Tips to Optimize Your WordPress RSS Feed appeared first on WPBeginner.


16 Ways to Optimize Your Used Hosting Diskspace


alt="16 Ways to Optimize Your Used Hosting Diskspace" src="http://whsr.webrevenueinc1.netdna-cdn.com/wp-content/uploads/2013/01/web-server-data-500x202_c.jpg" />

You bought a web hosting package that you thought would suffice to the needs of your website. Perhaps you knew that title="Unlimited Web Hosting " href="http://www.webhostingsecretrevealed.net/the-truth-about-unlimited-hosting/">unlimited web hosting is more of a chimera and you went for a few GB plan with some decent bandwidth. Sounds good. But where did problems come up, then? After a few months of meticulous management, for some unknown reason, your webdisk quota appears hideously small, while that usage percentage bar dangerously approaches the 100%.

class="border alignright" alt="Disk Space Optimization" src="http://www.webhostingsecretrevealed.com/images/2012/1030-1.jpg" width="450" height="315" />

You are a few steps from buying an upgrade, aren’t you?

Before you even think about a purchase, stop for a moment and analyze the situation. What may have gone wrong?

  • Your installed software – Are script upgrades getting heavier?
  • Your databases – Are they getting bigger in size as your content and user feedback grows?
  • Your webmail accounts – Did you check that they’re not reaching their assigned quota?
  • Your Websites – Have you been adding more subsites to your account (in subfolders, subdomains or addon domains)?

Some, all or more of the above may be the causes of your sudden package inadequacy. The 16 tips below will guide you to the resolution of this problem, suggesting what and how to optimize within your web hosting account. Leave upgrades as a last resort in case none of the tips work (wanna bet? :)).

1. Clean up your WordPress (or other script) installation

Unused theme files, plugins, hacks: if you’re not going to use them in the future, get rid of them. Lighten your database by deleting all spam comments, spam users, broken links, old drafts and WordPress post revisions.

2. Delete old emails from your webmail accounts

They eat up web disk and don’t contribute to your website health. Download your old emails that you want to keep and trash the remainder.

3. Get rid of your test files

You’re not using them anymore, so why keep them? Always remove your test files and installations once you’re done with the testing.

4. Disable Awstats, Webalizer and other traffic scripts

And remove the current files and their folders. These traffic analysis tools are excellent in performance, but they do need several megabytes and you can’t be too generous if your disk quota is restricted. You can replace these tools with online services such like href="http://www.google.com/analytics/" target="_blank">Google Analytics, href="https://mixpanel.com/" target="_blank">Mixpanel and href="http://www.openwebanalytics.com/" target="_blank">Open Web Analytics. If you can’t disable the scripts, your host might have denied you of the permissions, so contact them and ask for assistance.

5. Consider a script replacement rather than an upgrade

That is, if the upgrade is too heavy for your servers. I’ve had to switch to FanUpdate and Chyrp on small hosting accounts that could not stand a 20+ MB WordPress upgraded package. If you can’t make the switch, minimize your installation (see tip #1 in this list).

6. Consider moving your subsites elsewhere

A second hosting account, a Blogger or WordPress.com blog, a free package from another provider. Setup your priorities: your personal blog can certainly make use of a less expensive or free package than your business website.

7. Consider moving email accounts elsewhere

Your computer email client (POP or IMAP), for example, or the email apps offered by Google. And what about email forwarders? They’re all excellent ways to reduce the load on your hosting account.

8. Host all media on external services

Videos, images, music files and downloadable packages can be uploaded on href="http://www.youtube.com/">YouTube, href="http://beta.photobucket.com/?home_ab=true" target="_blank">Photobucket or href="http://www.mediafire.com/" target="_blank">MediaFire. Please note that these files are a major factor when it comes to reaching your webdisk quota.

9. Remove log files

Log files are useful because they let you monitor your hosting account activity while you’re away, but there’s no reason for them to remain on server. Once you downloaded and reviewed log files, you can safely remove them and free up megabytes of webdisk.

10. Remove old/unused installations

There’s no point in keeping these files on server. Old script versions and ‘ghost’ files from deleted installations only eat up disk quota and don’t serve to your website needs, so get rid of them.

11. Remove installation backups

Scripts like WordPress and phpBB leave on-server backups at every upgrade. These files, usually in .zip or .tar.gz compressed format, are only useful if you need to re-install anything that got lost with the upgrade, or if you wish to restore the old version. If you don’t, they’re candidate to removal.

12. Remove installation doc files

When you install a script, either manually or via your host’s preconfigured installer (e.g. Fantastico, Softaculous), the procedure will copy a ‘doc’ (or other name) folder containing a user guide. While this guide can be useful reference material, it’s unnecessary to the well-being of the script, so you can safely remove it and free up some Kb-to-MB of webspace. You should keep your README.txt and license.txt files, though, in the case the author requires them for a legitimate use of the script.

13. Don’t allow user uploads

If tip #8 suggests to refrain from hosting your own media on server, the advice is even more valid for user uploads. Don’t allow your blog readers or forum users to upload photos and videos. Your diskspace and bandwidth are limited and precious.

14. Use cloud services for common scripts (ex. jQuery)

There are a number of providers you can use — Google is an example — that host the most common href="https://developers.google.com/speed/libraries/">JavaScript libraries on their own servers. Since you’re no longer hosting the libraries yourself, you’ll earn extra Kb (or MB) and, thanks to the services’ caching functions, optimize the script loading time for an improved user experience.

15. Minimize your CSS and make it external

You can effectively increase your website efficiency by using external stylesheets, because your pages will load significantly faster and you’ll have saved several kilobytes of diskspace. To make CSS files even lighter, minimize the code by removing indentations and non-essential spaces. One-line stylesheets may not be easy to manage, but if you keep a human readable version on your computer and leave a minimized version on server, you’ll win in extra space and loading speed.

16. Lighten your HTML pages by removing Flash

Don’t use Flash to include videos in your webpages: it’s heavy for the server and for your webdisk, too. A valid alternative is the href="http://www.w3schools.com/tags/tag_video.asp" target="_blank">HTML5 video tag, which is lightweight and efficient.


Page 18 – Web Hosting Secret Revealed


How to Optimize Your Website Images


alt="How to Optimize Your Website Images" src="http://whsr.webrevenueinc1.netdna-cdn.com/wp-content/uploads/2014/01/jpeg-mini-500x352_c.jpg" />

If you take a look on the Internet, it becomes quite clear that most pages contain attractive images. They can be illustrations, graphics, icons, or photographs. Focus on your images when you want to optimize your website’s content or the sites you are creating for customers. With a few simple adjustments, those pictures can boost your ranking and increase web traffic.

Exporting images using favourite graphics software is something many of us do regularly.

We fixate on the image’s preview, cautiously adjust the quality, and optimize the settings. We tweak until the file size and quality are as perfect as they can get. A lot of people use the “Save for Web” feature to export images. This specific tool can help users to produce excellent GIF, JPEG, or PNG format images. After being careful and meticulous throughout the entire process, you would think that every picture will be perfect. Unfortunately, that is not always the case.

We all know how frustrating it is when you have to wait for a website to show up after clicking on the URL. Why does it often take longer than it should? Browsers need to download a lot of data. It keeps users waiting. title="Improve site speeds" href="http://www.webhostingsecretrevealed.net/blog/seo/speed-up-your-website/">The longer it takes, the more frustrated they get. Eventually, they click away. You can prevent this by using a number of popular tools created specifically to optimize images to the fullest.

With such an abundance of choices, which graphics editing software should you use for your image optimization projects?

Image Optimization Solutions

Many of today’s image optimization tools can be used by professional web designers as well as Internet fans trying to enhance their personal site. Install at least one popular optimization tool, because one is better than none at all. The goal of using technology is to speed up the website, and keep visitors satisfied. Research your options, as quite often, some image quality is lost when shrinking the size and download time of GIF, JPEG, or PNG picture files. If the loss of quality is too noticeable and unacceptable to your work standards, move on to another tool. Collect recommendations from other designers.

Image Optimization Tools Recommendations

Always aim for the biggest gain, which can be achieved by selecting the right tools. Each image optimizer has its own set of techniques to deliver impressive illustrations. Combine several applications for the most amazing results. Check out the following tools:

ImageOptim

style="text-align: center;">class="aligncenter size-full wp-image-8284 border" src="http://whsr.webrevenueinc1.netdna-cdn.com/wp-content/uploads/2014/01/image-optim.jpg" alt="image optim" width="750" height="491" srcset="http://whsr.webrevenueinc1.netdna-cdn.com/wp-content/uploads/2014/01/image-optim.jpg 750w, http://whsr.webrevenueinc1.netdna-cdn.com/wp-content/uploads/2014/01/image-optim-300x196.jpg 300w" sizes="(max-width: 750px) 100vw, 750px" />

Use ImageOptim when you want to load images faster and take up less disk space. This tool works by finding the best combination of compression parameters. You will not have to worry about colour profiles and unnecessary comments when publishing your enhanced images on the web. ImageOptim is also ideal for making iPhone/iPad and Mac applications smaller.

class="meteor-icon" style="font-size:130% !important;">
class="icon-file-text-alt" style="color:inherit !important;">
Learn more, visit online: href="http://imageoptim.com/" target="_blank">http://imageoptim.com/

ImageAlpha

style="text-align: center;">class="aligncenter size-full wp-image-8281 border" src="http://whsr.webrevenueinc1.netdna-cdn.com/wp-content/uploads/2014/01/image-alpha.jpg" alt="image alpha" width="750" height="400" srcset="http://whsr.webrevenueinc1.netdna-cdn.com/wp-content/uploads/2014/01/image-alpha.jpg 750w, http://whsr.webrevenueinc1.netdna-cdn.com/wp-content/uploads/2014/01/image-alpha-300x160.jpg 300w" sizes="(max-width: 750px) 100vw, 750px" />

Drag a true-colour PNG image into the main screen of the image minifier. Small images should be converted immediately. If an image is too large, the progress spinner should be visible for a few seconds, and complete the shrinking process. If the quality is not satisfactory, select between Median Cut and Posterizer compression, and try the Dithered mode. Reduce the number of colours if you still want the photo to be smaller. ImageAlpha stands apart because of its unique conversion method of PNG24 to PNG8. The savings are many times bigger than when utilizing other popular PNG optimizers, like TinyPNG and Smush.it. Another benefit of this tool is that the conversion continues to maintain alpha-transparency in all browsers.

class="meteor-icon" style="font-size:130% !important;">
class="icon-file-text-alt" style="color:inherit !important;">
 Learn more, visit online: href="http://pngmini.com/" target="_blank">http://pngmini.com/

Advpng or AdvanceCOMP

Advpng has an excellent speed/compression ratio. The main purpose of this tool is to recompress png files to the smallest size possible. The strategies this utility uses include removing ancillary chunks, concentrating IDAT chunks, and using 7zip Deflate implementation. AdvanceCOMP is a collection of recompression utilities for .PNG snapshots, .ZIP archives, .GZ files, and. MNG video clips. It allows users to modify an already-compressed file, in order to reduce the file-size by optimizing the condensed image, in addition to recompressing snapshots, rom, and clip collections of emulated games.

class="meteor-icon" style="font-size:130% !important;">
class="icon-file-text-alt" style="color:inherit !important;">
Learn more, visit online: href="http://advancemame.sourceforge.net/doc-advpng.html" target="_blank">http://advancemame.sourceforge.net/doc-advpng.html

JPEGmini

style="text-align: center;">class="aligncenter size-full wp-image-8282 border" src="http://whsr.webrevenueinc1.netdna-cdn.com/wp-content/uploads/2014/01/jpeg-mini.jpg" alt="jpeg mini" width="750" height="528" srcset="http://whsr.webrevenueinc1.netdna-cdn.com/wp-content/uploads/2014/01/jpeg-mini.jpg 750w, http://whsr.webrevenueinc1.netdna-cdn.com/wp-content/uploads/2014/01/jpeg-mini-300x211.jpg 300w" sizes="(max-width: 750px) 100vw, 750px" />

JPEGmini photo optimization technology can reduce the file size of JPEG photos by up to 5 times, all while preserving the perceptual quality and resolution of the original images. The savings are remarkable as this image recompression technology allows you to maximize the storage of photographs on your computer’s hard drive and on online photo service accounts. It is also easier to email images and upload them faster to the Internet. The fact that JPEGmini files are in standard JPEG format is another great advantage. Images can be viewed and edited by any existing browser and photo software.

class="meteor-icon" style="font-size:130% !important;">
class="icon-file-text-alt" style="color:inherit !important;">
 Learn more, visit online: href="http://www.jpegmini.com/" target="_blank">http://www.jpegmini.com/

PNG Quant

Are you looking for a new command-line utility tool with an image quantization library for converting quantize and dither 24/32-bit RGBA PNGs down to 8-bit RGBA-palette PNGs (or smaller)? PNGquant conversion can reduce file sizes up to 70 percent, all while preserving full alpha transparency. The adjusted images are still compatible with all of today’s key web browsers. Another advantage of this tool is that the pictures have a better fallback in IE6 than 24-bit PNGs. In conclusion, expect high-quality palette generation by combining vector quantization algorithms. The shell scripts, software, and GUIs are easy to integrate, and you have access to an exceptional adaptive dithering algorithm that limits image noise. Large amounts of images will be processed faster, even the color mapped ones.

class="meteor-icon" style="font-size:130% !important;">
class="icon-file-text-alt" style="color:inherit !important;">
 Learn more, visit online: href="http://pngquant.org/" target="_blank">http://pngquant.org/

10 Bonus Image Optimization Tips

Whether you maintain a personal website or are running an online store, you cannot ignore image optimization. Improving site increases traffics and conversion rate.

Consider the following tips:

  1. Image names should be descriptive, yet in plain English.
  2. Optimize Alt tags.
  3. Strategize image dimensions.
  4.  Reduce image file sizes to minimize download time.
  5. Determine if you should use JPEG, GIF, or PNG to achieve the best possible results.
  6. Handle thumbnails proficiently.
  7. Use image site maps.
  8. Select images wisely.
  9. Watch out when using content delivery networks.
  10. Test images frequently.

Bottom Line

Image optimization is part of any designer’s workflow. It can be a lot simpler when utilizing the most efficient technology for your projects. Nobody can tell you which tools to choose, because everyone’s needs are different. Complete ample research, and try out a number of applications before making a final decision. Maybe, you need several optimization solutions to attain astonishing results.


Page 16 – Web Hosting Secret Revealed