samedi 12 novembre 2016

21 Best WordPress Starter Themes for Developers in 2016


Are you just getting started with WordPress theme development? WordPress starter themes help you get started with a solid foundation. In this article, we have hand-picked the best WordPress starter themes for theme developers.


Best WordPress starter theme


What is a WordPress Starter Theme


A WordPress Starter theme is a blank theme with minimum design, and a basic or absolutely no layout. These themes usually come with the most commonly used templates in a WordPress theme.


They have code to display posts, archive pages, single posts, comments, but with minimum or no styling at all. This allows theme developers to quickly start adding their own styles to build a totally new theme.


Starter themes are different than a parent theme or a theme framework. Parent themes are fully styled WordPress themes designed to be installed and used on live websites. Theme frameworks provide a lot of hooks and filters for usage in child theme development.


Starter themes do not come with styling, you are not supposed to use them as it is, and they are not frameworks with custom hooks, filters, and template tags.


Instead, you use a starter theme to build a parent theme.


Having said that, let’s take a look at some of the best starter themes for WordPress.


1. Underscores


Underscores


Underscores is probably the most popular of all WordPress starter themes. Maintained by Automattic (the company behind WordPress.com blog hosting service), Underscores is a minimalist starter theme written in HTML5 and CSS. The clean code is meant to get out of your way and help you quickly build a standard compliant WordPress theme.


2. Components


Components


From the folks behind Underscores comes Components. It is basically 6 starter themes for different kind of websites. Currently there is a base, blog, blog modern, portfolio, business, and magazine starter theme available for download.


3. Bones


Bones


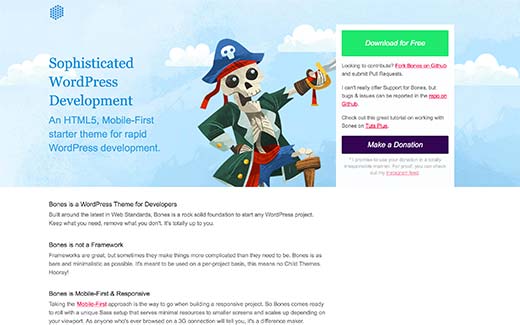
Bones is a WordPress starter theme developed with a focus on mobile-first approach. It uses Sass and comes equipped with ready to use code for custom post types and custom dashboard functions.


4. Sage


Sage


Sage is a modern WordPress starter theme based on Gulp, Bootstrap, and Bower. It uses a Theme Wrapper which helps you avoid repeating the same code in every template. Sage is actively maintained and has a strong following among WordPress front-end developers.


5. FoundationPress


FoundationPress


Based on Foundation 6 framework, FoundationPress is a modern WordPress starter theme. It comes with clean semantic code and powerful customization features that make it easier for you to rapidly build WordPress themes.


6. UnderStrap


Understrap


UnderStrap is a WordPress starter theme based on Underscores and Bootstrap 4. It comes with a mobile first, responsive grid framework, and its super easy to customize.


7. Bootstrap Four


Bootstrap Four


As the name suggests, Bootstrap Four is a WordPress starter theme based on Bootstrap 4 framework. It provides a clean code base for theme developer to do whatever they want.


8. WP RootStrap


WP Rootstrap


WP Rootstrap is a Boostrap 3 based WordPress starter theme for developers. It uses Options Framework for theme options.


9. Generic


Generic


Generic is a simple WordPress starter theme. Generic is plain and just as minimal as you would like your starter theme to be.


10. BlankSlate


Blankslate


Blankslate is a simple and extremely flexible WordPress starter theme. It is designed with developers in mind. It is simple yet comes with powerful foundation for your themes to rely on.


11. CyberChimps


Cyberchimps


CyberChimps is a fully responsive WordPress starter theme built with Bootstrap. It comes with a touch-friendly drag and drop options panel which allows users to customize their site using touch devices.


12. Klasik Framework


Klasik Framework


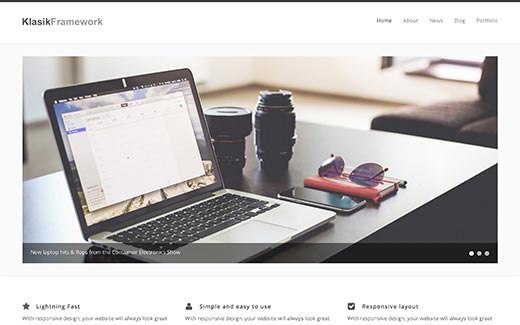
Built with quicker theme development in mind, Klasik Framework is a simple starter theme for WordPress. Theme features 9 widget area, 8 custom widget and simple Theme Option for full CMS control


13. Start


Start


Start is based on Underscores starter theme and Bootstrap framework. It inherits all the code of Underscores and adds Bootstrap magic for rapid front-end development.


14. A11Y’All


A11Y'all


If accessibility is a main concern for you, then you will love A11Y’All. It is a WordPress starter theme designed from scratch with accessibility in mind. It includes page templates and customizable menus, header, widgets and background.


15. Cornerstone


Cornerstone


Cornerstone is a modern starter theme for WordPress developers. It is based on the popular Foundation framework. It comes ready with custom header, sidebar, widgets, and navigation menu locations pre-defined.


16. WP-Flex


WP-Flex


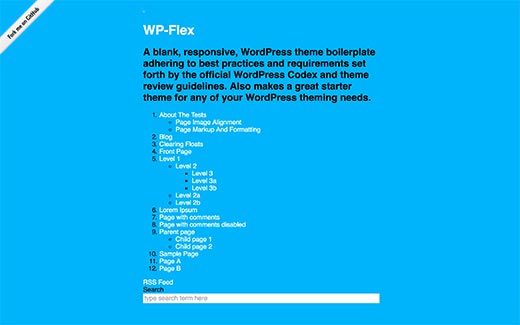
WP-Flex is a blank WordPress theme or starter theme. It adheres to WordPress coding best practices and guidelines provided by WordPress theme review team. This basic theme can be a good starting point for any custom WordPress design.


17. JointsWP


JointsWP


JointsWP is a rock solid WordPress starter theme. It is based on the Foundation 6 framework and comes in CSS or Sass flavors.


18. _tk


_tk


Themekraft’s _tK is modern responsive WordPress starter theme. It is based on Twitter’s Bootstrap framework and the Underscores starter theme.


19. Quark


Quark


Quark is an easy to customize WordPress starter theme. It is based on Underscores and Twenty Twelve WordPress theme. It uses Normalize to make sure that browsers render all elements more consistently and Mordernizr for detecting HTML5 and CSS3 browser capabilities.


20. Nebula


Nebula


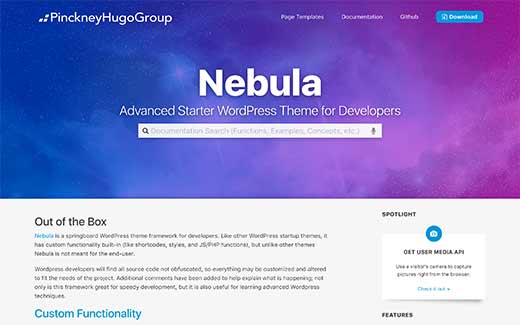
Nebula is an advanced WordPress starter theme that is more like framework but not completely a framework. It is a starter theme with lots of custom functionality like recommendation engine for 404 and no-search-result pages, and Autocomplete Search, etc.


21. HTML5Blank


HTML5Blank


HTML5Blank is a easy to use WordPress starter theme. It is based on clean HTML5 and CSS3 templates with ready to use code and template tags for you to utilize during your theme development.


We hope this article helped you find the best WordPress starter theme for developers. You may also want to see our guide on how to add dummy content for theme development in WordPress.


If you liked this article, then please subscribe to our YouTube Channel for WordPress video tutorials. You can also find us on Twitter and Facebook.


The post 21 Best WordPress Starter Themes for Developers in 2016 appeared first on WPBeginner.


How to Create a Custom Facebook Feed in WordPress


Recently, one of our users asked if we could cover how to create a custom Facebook feed in WordPress? You can display Facebook posts from your page or group on your WordPress site to improve engagement. In this article, we will show you how to create a custom Facebook feed in WordPress.


Adding a Facebook feed in WordPress


When and Why You Should Create a Custom Facebook Feed in WordPress


Facebook is the largest social media platform in the world. As a website owner, you may already be engaging with your audiences on Facebook through your Facebook page or by creating a Facebook group.


However, all the posts you make on Facebook are not visible to the people visiting your website. By adding a custom Facebook feed you can show what’s happening on your Facebook page or group to your site visitors.


This will allow more of your users to see your posts and will help you get more Facebook likes. If you are using Facebook remarketing/retargeting pixel on your website, then you can show your ads to those users on Facebook as well.


Having said that, let’s see how to add a custom Facebook feed to your WordPress site.


Adding a Custom Facebook Feed in WordPress


First thing you need to do is install and acivate the Custom Facebook Feed plugin. For more details, see our step by step guide on how to install a WordPress plugin.


Note: This free version of the plugin does not display images in shared links or status updates. For that you will need plugin’s PRO version.


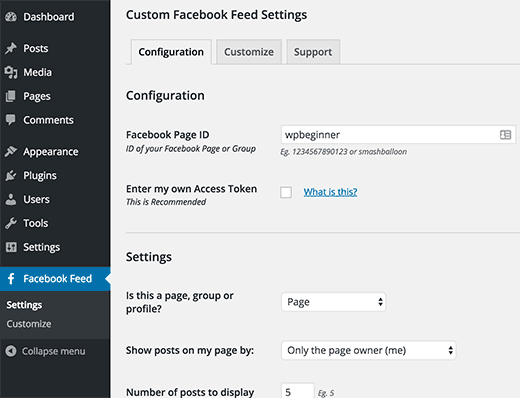
Upon activation, you need to visit Facebook Feed » Settings page to configure the plugin settings.


Custom Facebook feed settings


First you need to provide your Facebook page or group ID. If your Facebook page URL is like this:


https://www.facebook.com/your_page_name


Then you can use your_page_name as your Facebook page ID. On the other hand, if you have a Facebook page URL that looks like this:


https://www.facebook.com/pages/your_page_name/123654123654123


Then you need to use 123654123654123 as your page ID.


If you want to add a group, then you will need to enter your group ID. Simply visit Find My Facebook ID website, and enter the URL of your group in the search box. The website will reveal your Facebook group’s numeric ID.


The next thing you need to enter is an access token. The plugin will work even if you don’t add your own access token, however it is recommended to generate it and add it here.


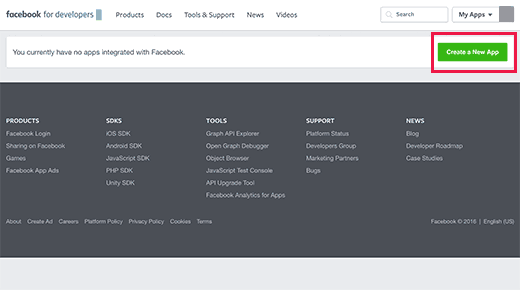
Simply visit Facebook developers website and click on the create new app button.


New Facebook app


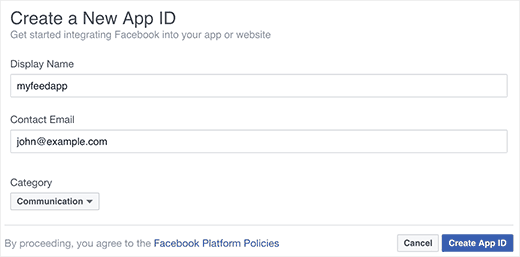
This will bring up a popup where you need to enter a name for your app. Provide an email address and then select a category for your app. Click on the ‘Create App ID’ button to continue.


Creating a new Facebook app ID


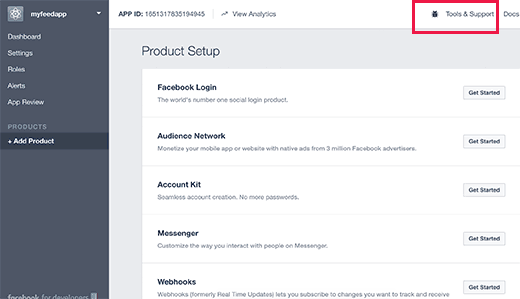
Facebook will create an app for you and will redirect you to the app’s dashboard. You need to click on Tools & Support link at the top.


Click on tools and support link at the top of your app's dashboard page


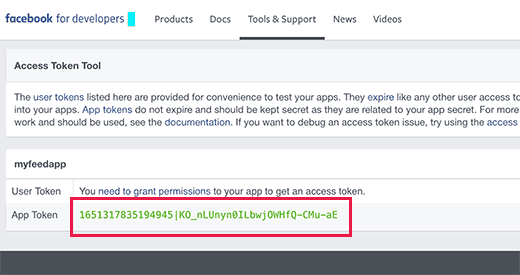
This will bring you to a page with lots of resources on how to use Facebook apps. You just need to click on ‘Access token tool’.


Access token tool


Clicking on the link will take you to a page where you will be able to see your app’s access token or app token.


Access token for your app


You can now copy and paste this access token to the custom Facebook feed plugin’s settings page.


Under the settings section on the page, you need to select whether you are showing a group or a page. You can also choose the number of posts to display, timezone, and language settings.


Don’t forget to click on the save changes button to store your plugin settings.


You can now create a new post or page or edit an existing one where you want to display your Facebook feed. In the post editor, you need to add this shortcode:


[custom-facebook-feed]


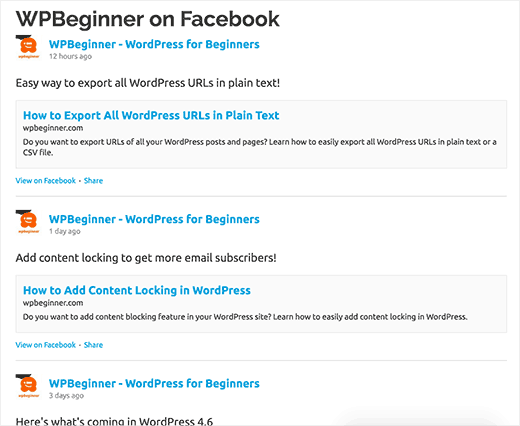
You can now save your page or post and preview it. It will fetch and display latest posts from your Facebook page or group in your WordPress page.


Preview of a custom Facebook feed in WordPress


Showing Multiple Facebook Feeds in WordPress


Let’s suppose you want to display more than one custom Facebook feed on your WordPress site. The plugin’s settings only allow you to add one page or group ID.


However, you can easily use the shortcode to display any other custom Facebook feed you want.


Simply add the shortcode like this:


[custom-facebook-feed id=wpbeginner]


The plugin’s shortcode comes with a whole range of parameters. You can visit the plugin’s website to see the complete list of parameters that you can use.


How to Customize The Appearance of Custom Facebook Feed


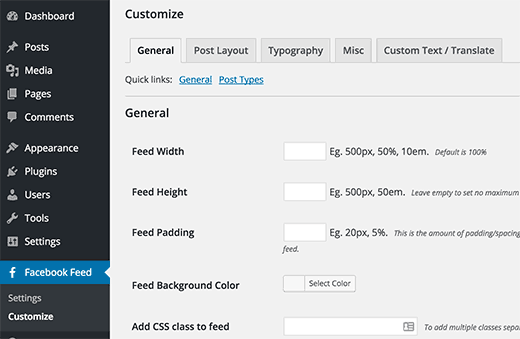
The plugin allows you customize the appearance of the custom Facebook feed on your website. Visit Facebook Feed » Customize page to edit the customization settings.


Customize appearance of Facebook feed


The customize section is divided into different tabs. Each tab has its own options, you may want to review them to customize the appearance of your custom Facebook feed.


We hope this article helped you add custom Facebook feed in WordPress. You may also want to see our list of 21 best social media monitoring tools for WordPress users.


If you liked this article, then please subscribe to our YouTube Channel for WordPress video tutorials. You can also find us on Twitter and Facebook.


The post How to Create a Custom Facebook Feed in WordPress appeared first on WPBeginner.


How to Create a Multi-Page Form in WordPress


Recently, one of our users asked us how to create a multi-page form in WordPress? Multi part forms allow you to collect more information without scaring the users away. In this article, we will show you how to create a multi-page form in WordPress.


Creating a multi-page form in WordPress


Why and When You Need Multi-Page Form in WordPress?


Forms are the easiest way to collect data and get in touch with your users. Whether it is a contact form, email capture form, or a simple survey.


However, lengthy forms are daunting for users and increases form abandonment.


To overcome this issue, user experience experts recommend multi-page forms. This way form fields are broken into sections and pages.


A multi-step checkout page example


With a progress bar on top and fewer fields on screen, users feel more at ease filling out the form. It provides a more engaging and interactive experience to your users.


Having said that, let’s see how to easily create a multi-page form in WordPress.


Creating A Multi-Page WordPress Form with WPForms


We will be using WPForms which is the most beginner friendly contact form plugin for WordPress. You will need at least the Basic license which costs .


You can use the WPForms coupon: WPB10 to get 10% discount on your purchase of any WPForms plan.


First thing you need to do is install and activate the WPForms plugin. For more details, see our step by step guide on how to install a WordPress plugin.


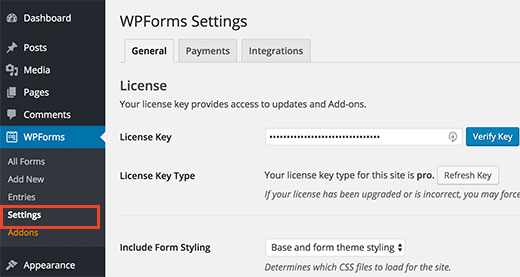
Upon activation, you will need to enter your license key. You can get this key by signing into your account on WPForms website.


Copy the license key and then visit WPForms » Settings page on your WordPress site. Paste the license key and then click on the verify key button.


WPForms license key


After verifying your license key, you are now ready to create your first multi-page form in WordPress.


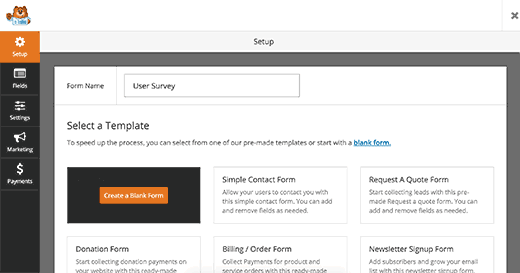
Simply go to WPForms » Add New page, and it will launch the Form Builder.


Adding a new form in WPForms


Provide a title for your form and then select one of the templates shown below. WPForms offers ready-made form to speed up the form creation process.


You can choose the one that closely matches your form requirements or choose a blank form. Clicking on a template will launch the form editor.


Form editor in WPForms


Simply click on the fields from left column to add them into your form. After that click on a field in the form to edit it. You can also drag and drop form fields.


Adding form fields in WPForms


After adding a few form fields, you are ready to add a new page to your form. Click on the Pagebreak field under fancy fields sections from the left column.


Adding pagebreak field


You will notice that WPForms will add a pagebreak marker to the bottom and a first page marker at the top of the page.


It will also push the submit button to the next page, and your first page will now have a ‘Next’ button instead.


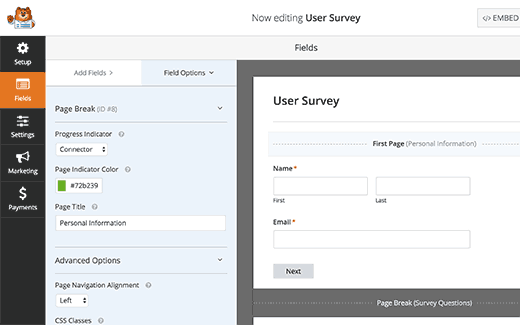
Click on the first page marker at the top to edit your multi-page form properties. In the left hand column, you can select a progress bar type. WPForms allows you to use a simple progress bar, circles, connector, or no progress indicator at all.


Edit first page marker to select progress bar type


For this tutorial, we will be using Connectors as progress bar. You can also choose the color of your page indicator. Lastly, you can provide a title for the first page.


Now you need to click on the pagebreak marker to edit its properties. Here you can provide a title for the next page. You can also edit the text to display on the Next button.


Edit page title and next button text


You can continue adding form fields after the pagebreak. If you are using the PRO version of WPForms, then you can also use conditional logic to show and hide form fields based on user responses.


After adding more fields, you can add more pagebreaks if you need.


Once you are done creating your form, click on the save button on the top right corner of the screen.


Congratulations, you have successfully created your first multi-page form.


Adding Your Multi-Page Form into WordPress Posts and Pages


WPForms makes it super easy to add forms into WordPress posts and pages.


Create a new post/page or edit an existing one. On top of the post editor, you will see an ‘Add Form’ button.


Add form button


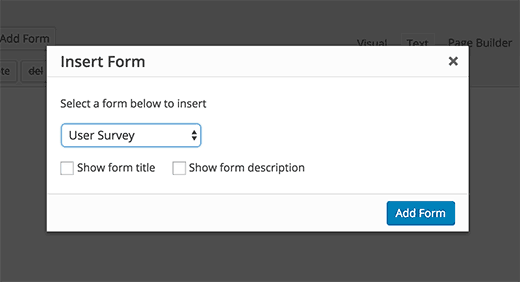
Clicking on it will bring up an insert form popup.


Select your form from the drop down list and then click Add Form button.


Select and insert your multipage form


You will notice WPForms shortcode added into your post/page. You can now save or publish this post or page.


Visit your website to see your multi-page form in action.


Preview of a paged form in WordPress


We hope this article helped you add a multi-page form in WordPress. You may also want to see our guide on how to add a contact form popup in WordPress.


If you liked this article, then please subscribe to our YouTube Channel for WordPress video tutorials. You can also find us on Twitter and Facebook.


The post How to Create a Multi-Page Form in WordPress appeared first on WPBeginner.


How to Split Post or Page Title in WordPress


Do you want to split a WordPress post or page title into a new line? By default, your post title is just a single heading, and you cannot break it into a new line. In this article, we will show you how to split post or page title in WordPress.


Split post or page title in line breaks


Difference between Split Title and a Subtitle in WordPress


Splitting a post or page title allows you to break the title into a new line without changing formatting or style.


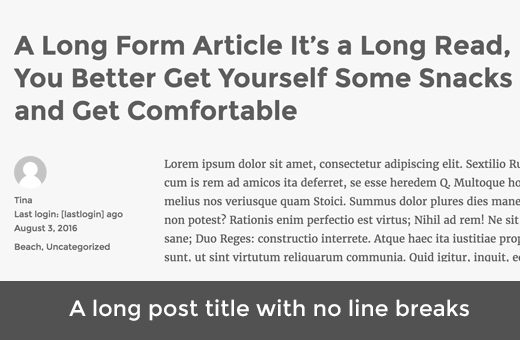
A long post title


On the other hand, a subtitle allows you to add two different headings for your WordPress post or page.


A WordPress page with a title and subtitle


See our tutorial on how to add subtitle for posts and pages in WordPress for detailed instructions.


Having said that, let’t see how to split post or page title in WordPress without writing any code.


Split Post or Page Title in WordPress


First thing you need to do is install and activate the Page Title Splitter plugin. For more details, see our step by step guide on how to install a WordPress plugin.


Upon activation, you need to edit a post or page where you want to split the title. On the post editor screen, you need to click on the little button below the title field.


Split button


Clicking on the button will add a pointer below the title field. You will need to click on the pointer to select it.


After that you can move the cursor inside text field to the point where you want to split the title.


Title splitter marker


You can also add multiple split points to break your title into more lines. Just click on the icon and then move the marker by selecting and putting the cursor at the right place.


Multiple splits


You can also delete a marker. Just click on a marker to select it, and you will notice that the title splitter button will turn into a close button. Clicking on it will remove the title splitting marker from your post title.

Once you are finished adding and adjusting the split marker, you can just save or publish your post.


You can now visit the post or page to see the split post title on your website.


A post title splitted into line breaks


We hope this article helped you learn how to split post or page title in WordPress. You may also want to see our guide on how to add a reading progress bar with your WordPress posts.


If you liked this article, then please subscribe to our YouTube Channel for WordPress video tutorials. You can also find us on Twitter and Facebook.


The post How to Split Post or Page Title in WordPress appeared first on WPBeginner.